RV Miscellaneous Mods | RV Mods
Here are some mods that did not qualify for their own page - newer ones are at the bottom:
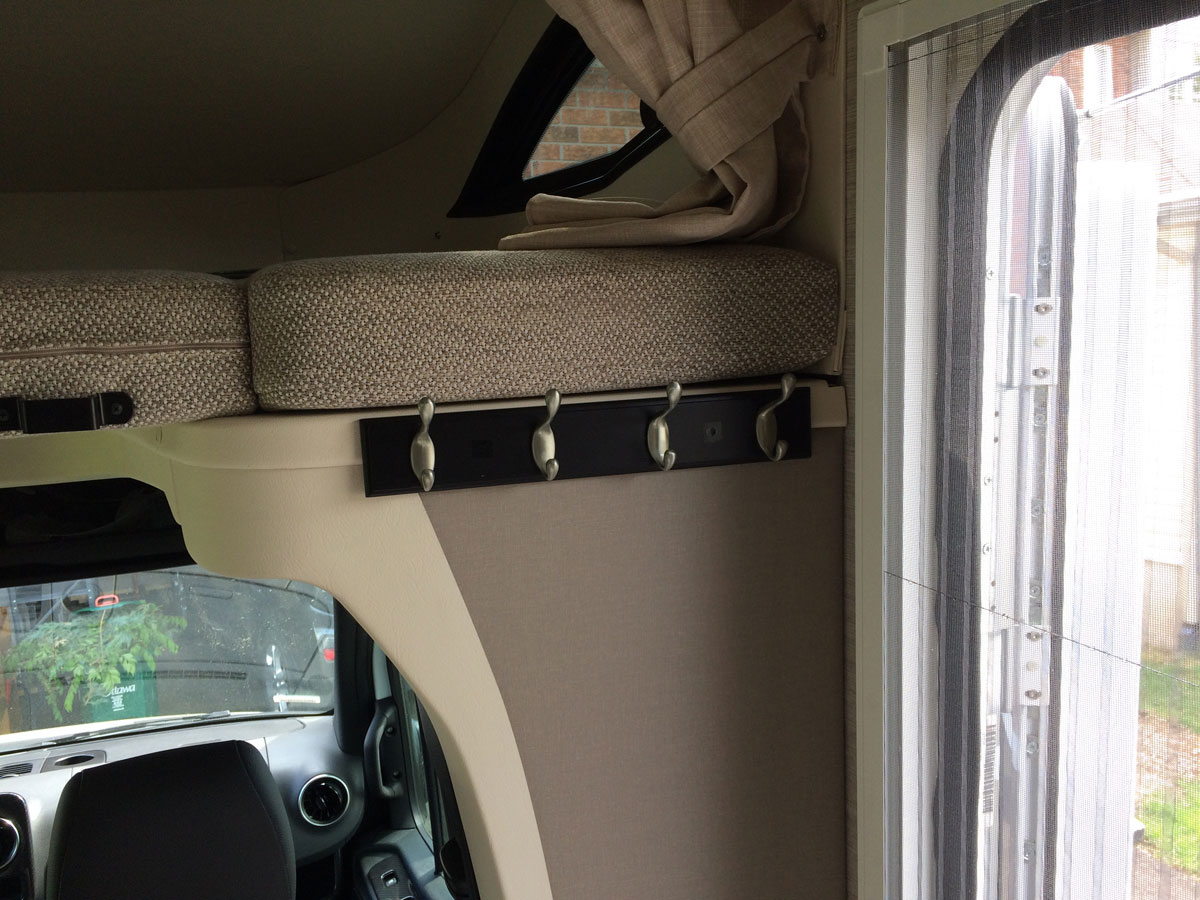
Coat Rack
This was a great idea I found on Another View Website . (They have since moved on from their View, but have kept all of their Winnebago mods on their webpage.)
I selected a coat rack that kinda matched the interior, and gave us lots of space to hang up those things that always seem to be needed by the door. I removed the ladder holder, as we don’t carry around the ladder, and secured the coat rack to the solid structure behind the plastic trim on the bed bottom. It looks good and works very well:
Drink / Phone Holders
When sitting at the dinette table, either eating or playing games, I always seemed to be looking for somewhere to put my beverage. I added two drink holders on either side of the dinette window - both were fastened with the scews that came with the holders, and are secured firmly to the face panel that makes up the surface of the interior wall. The only placement consideration was to ensure that the blinds operated without impacting the functionality of the holder. These also make handy spots to place a phone, too.
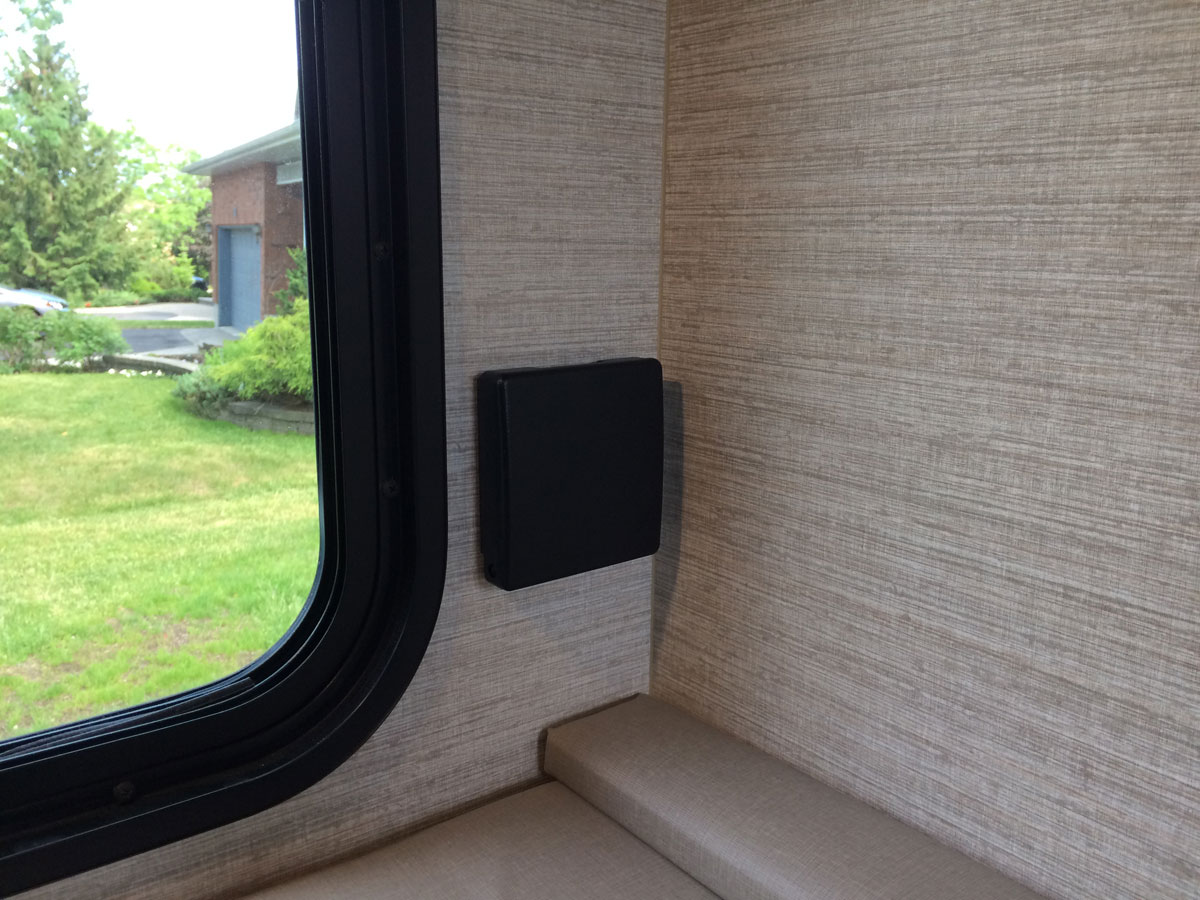

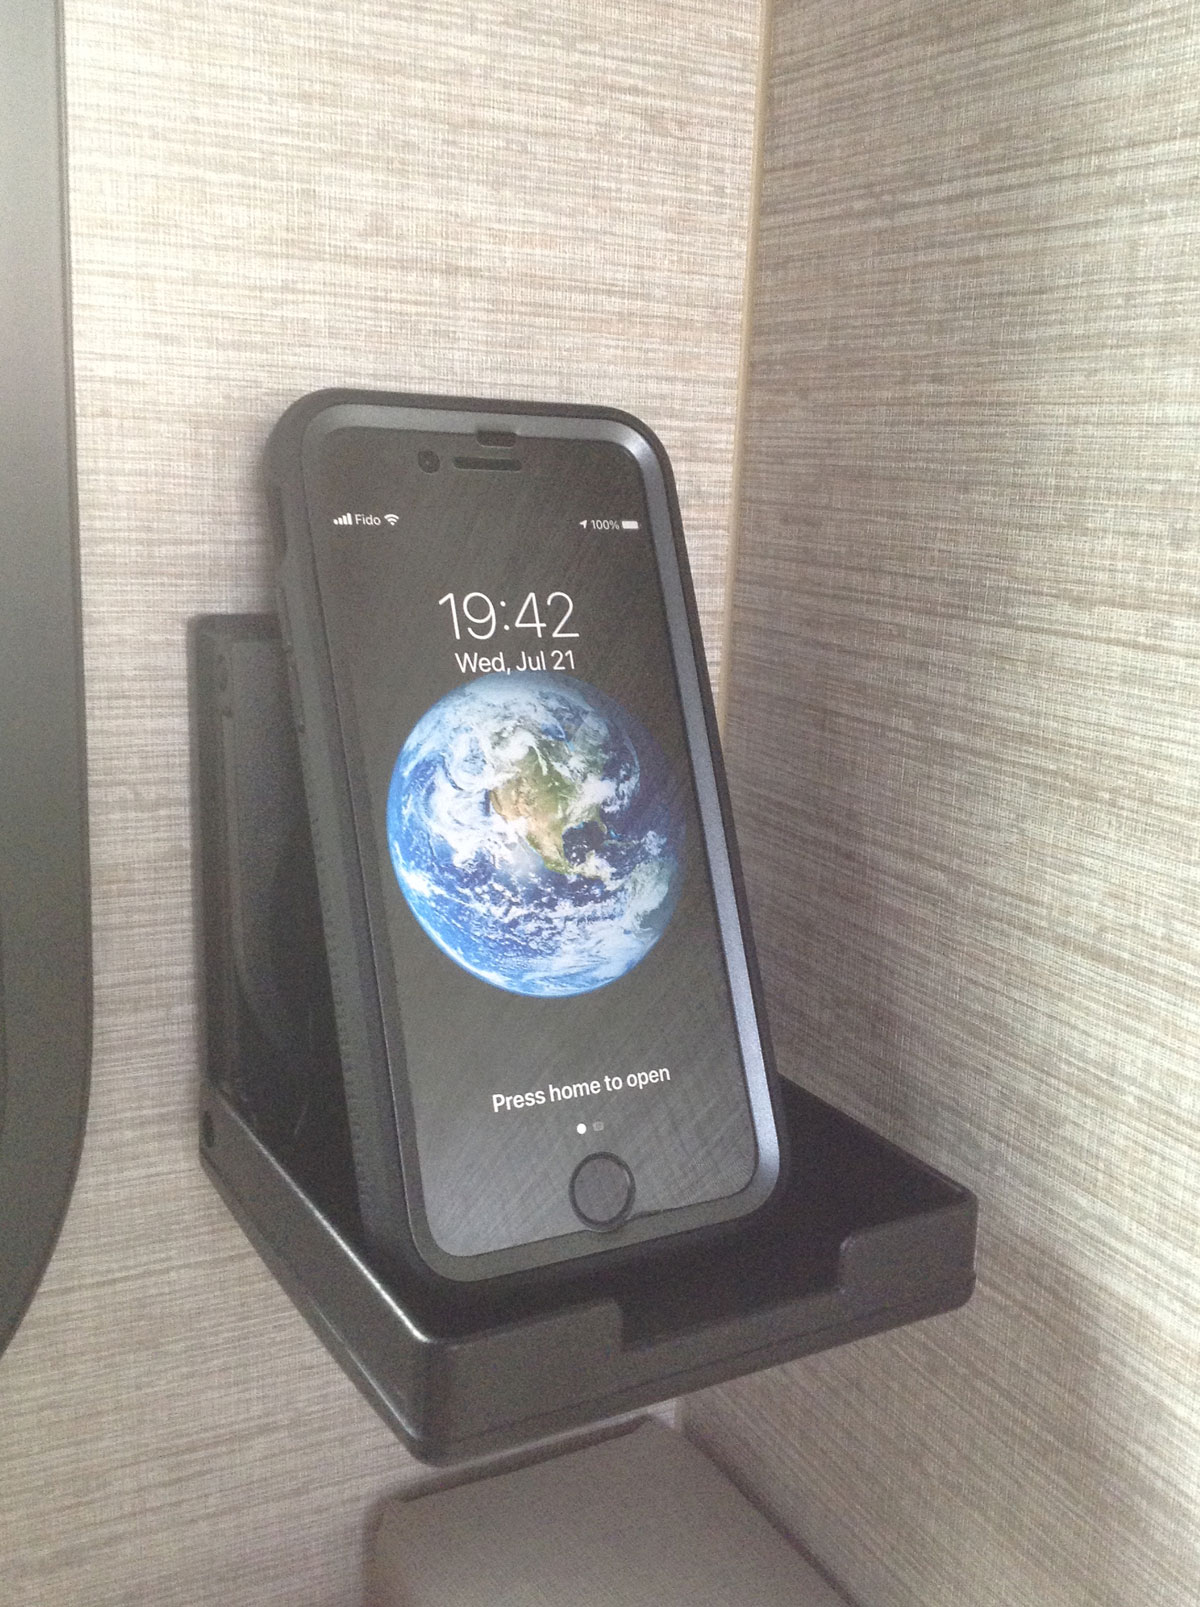
Here is a link to the Camco Drink Holders that we installed.
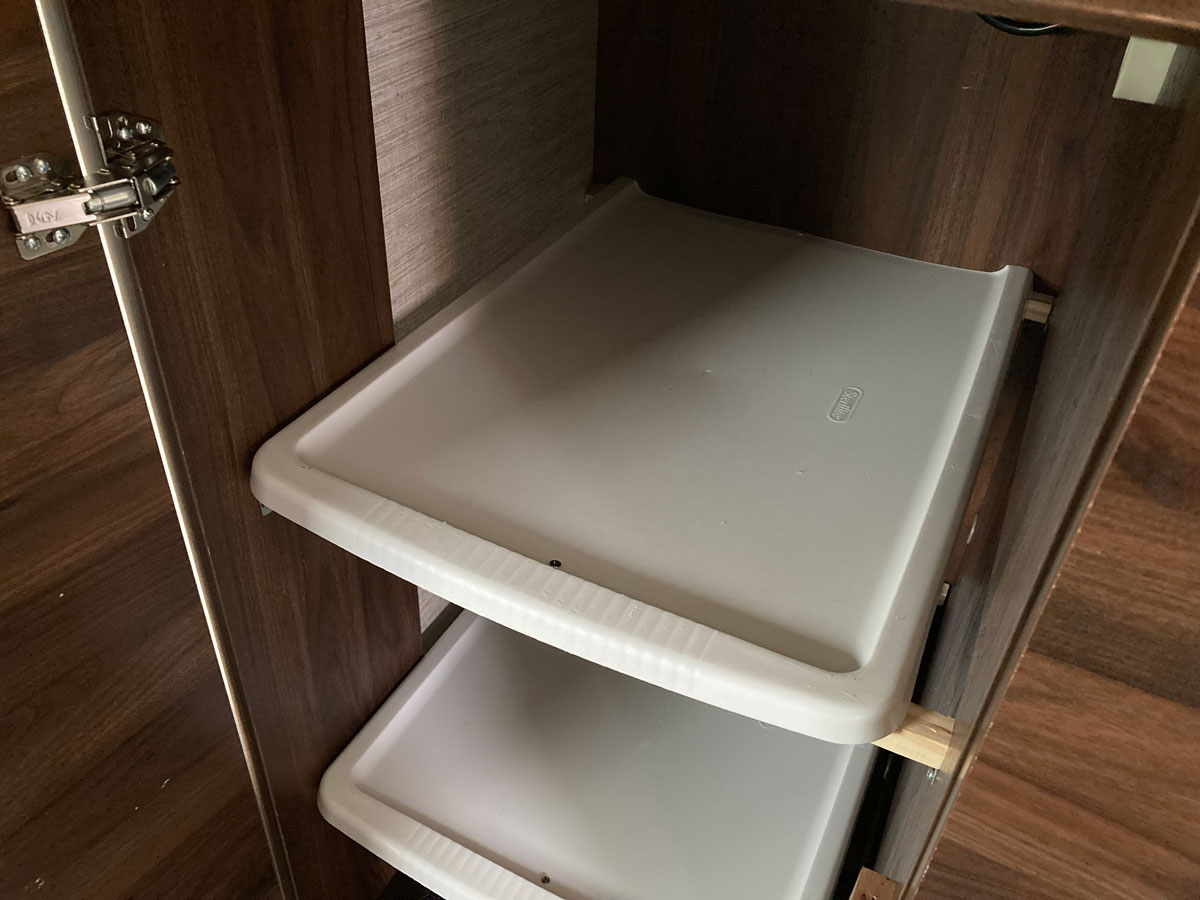
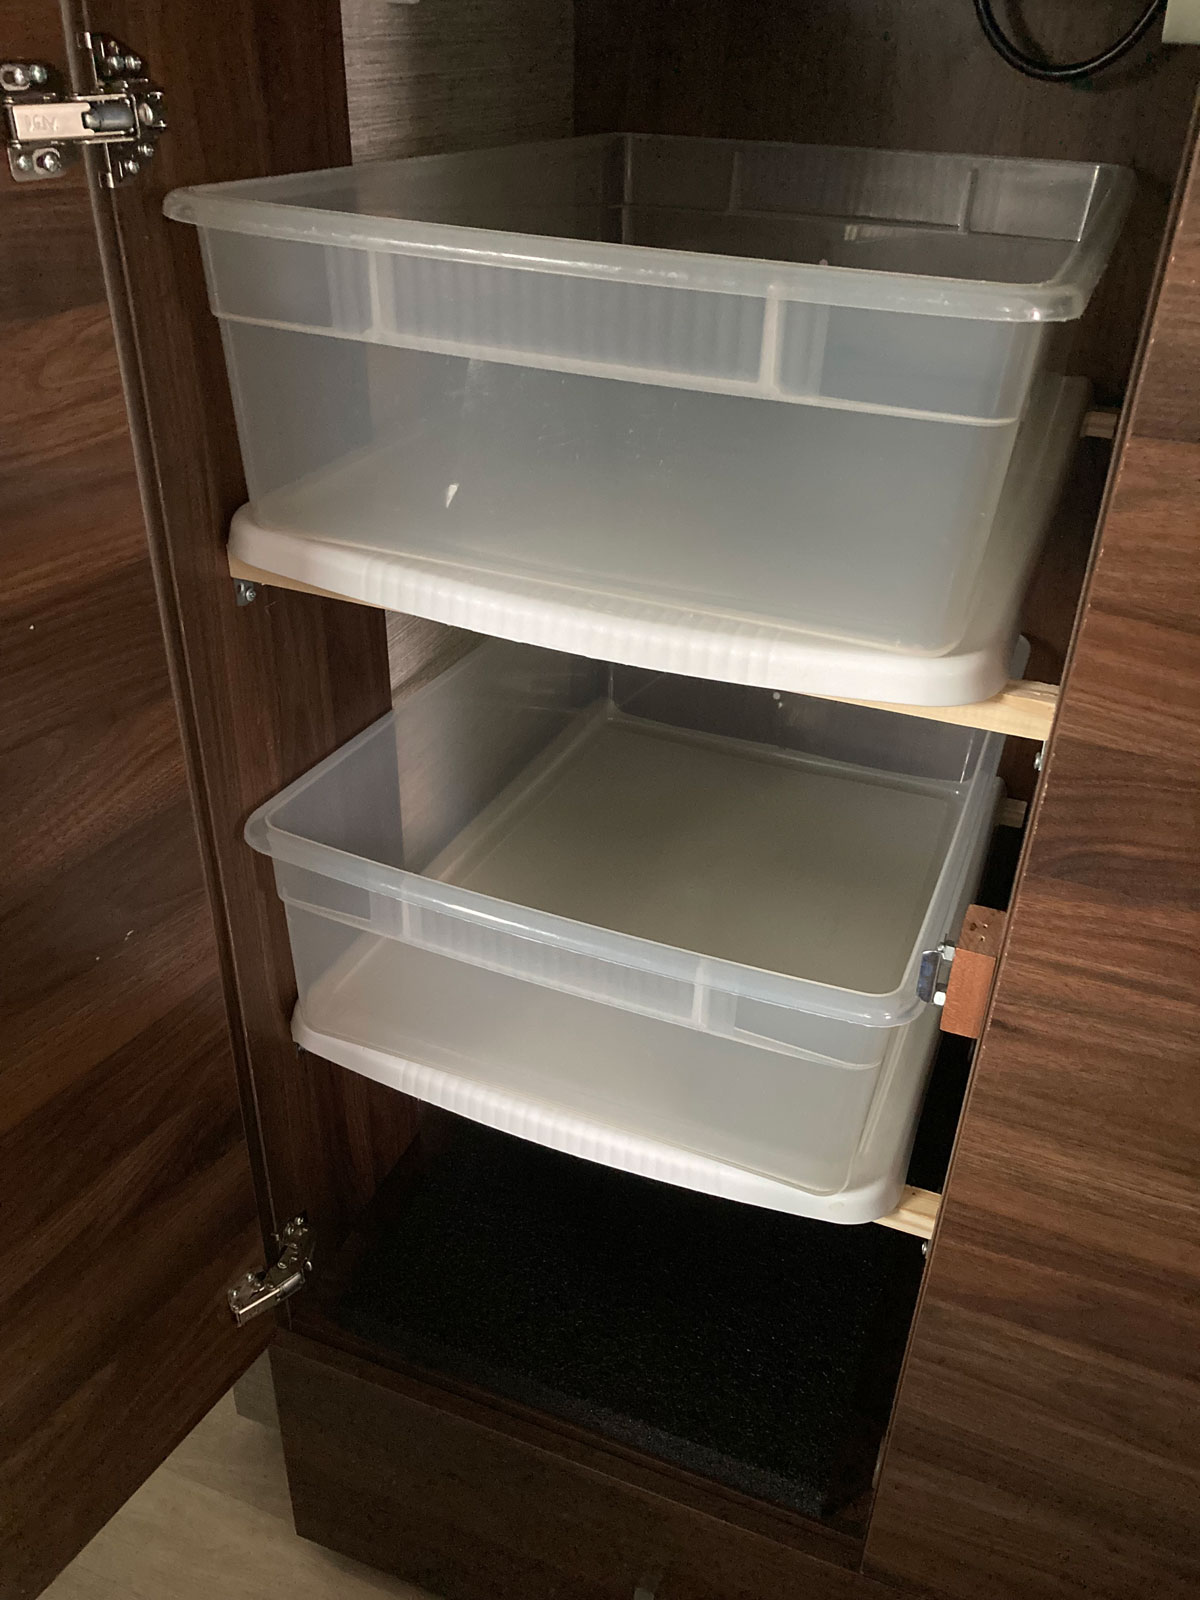
Closet Drawers
We don’t have the requirement to hang clothes, except for the coats at the front door. I installed some shelves in the cloak closet that enabled us to haul clothes in and out of the house and stow them easily in the View. I had a couple of storage totes in the basement, so I modified the lids to make the shelves - now we load up the bins in the house and just drop them on the shelves when it is time to hit the road.
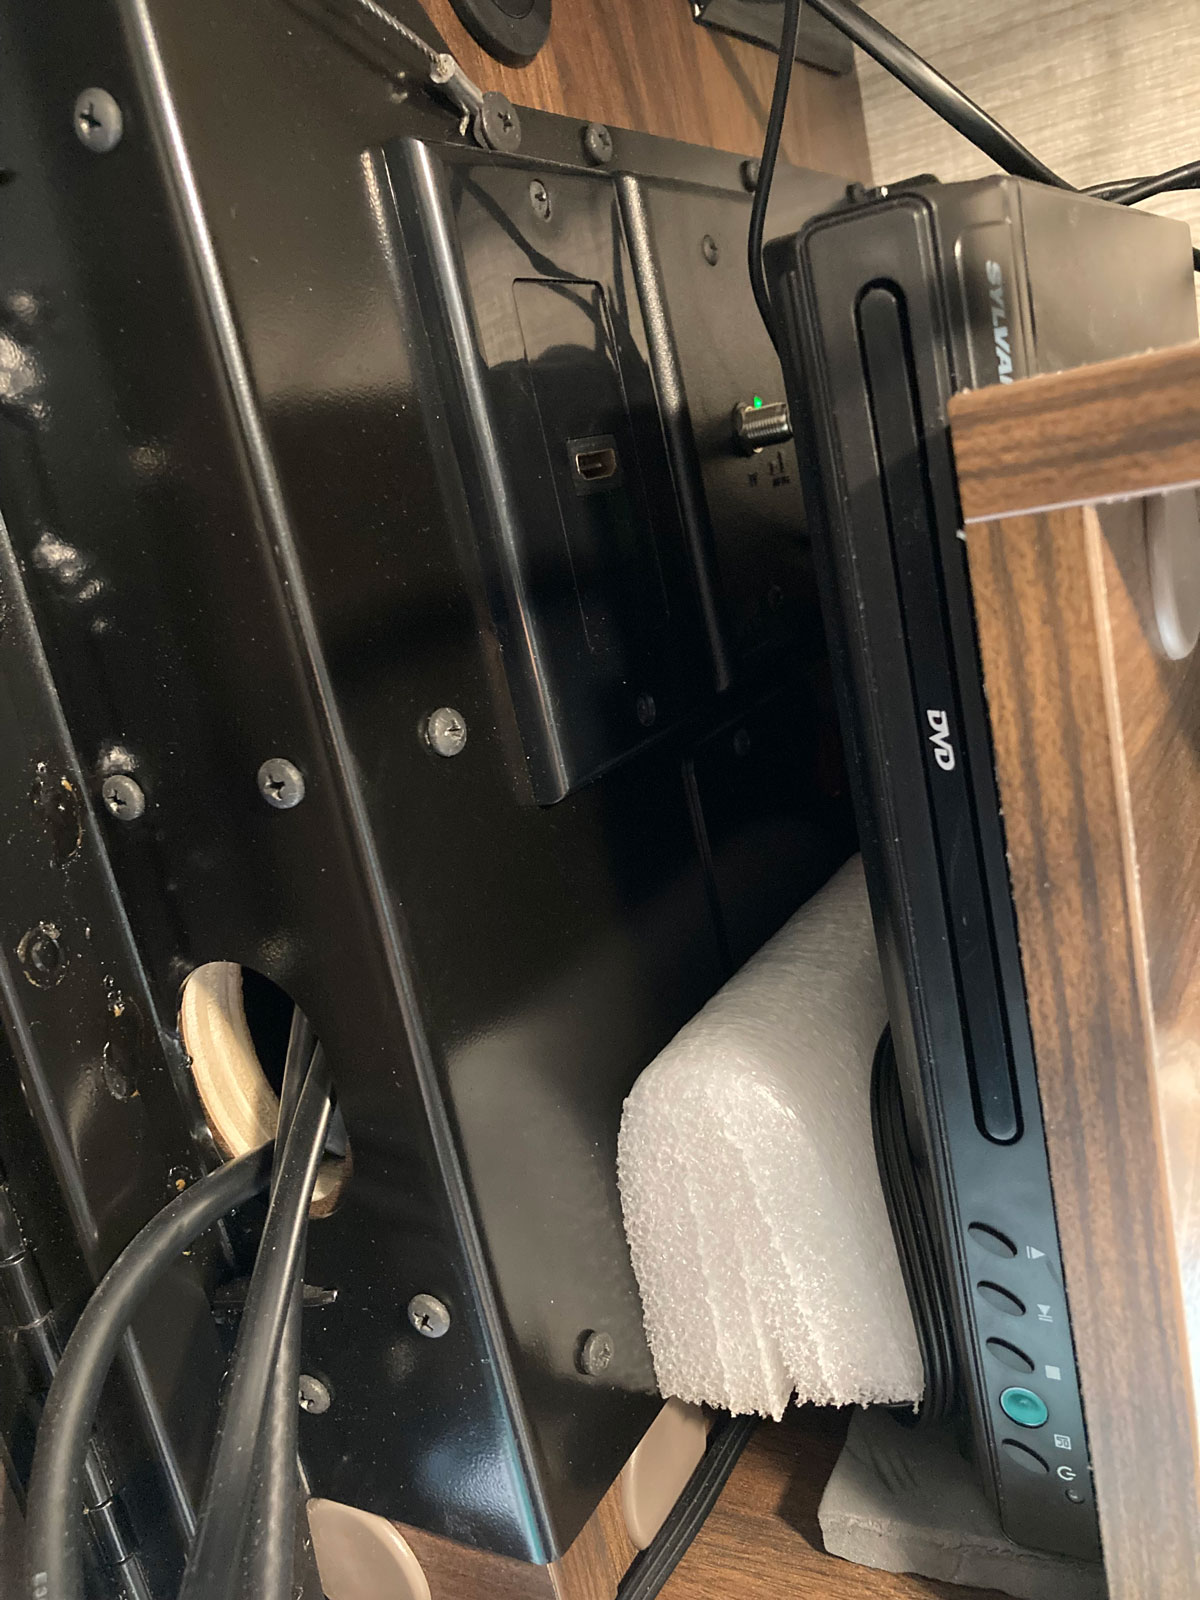
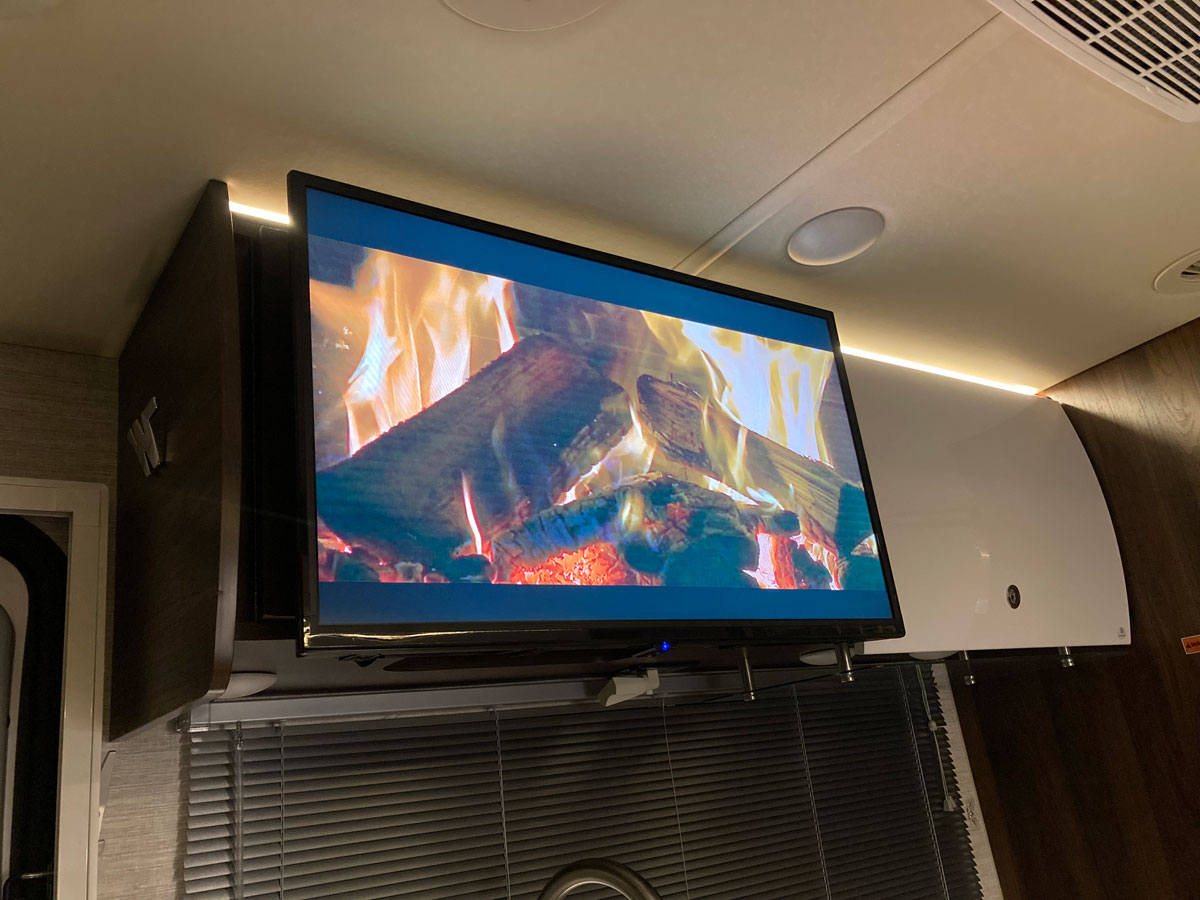
Compact DVD Player
Our previous motorhomes had a DVD, and to be honest - we did not use it very often. The exception was watching our “Fireplace DVD” on the TV when temperatures turned cool. We searched for a DVD player that was ultra compact, considering it was going to be dead weight for most of the year. We found one online that fit the bill:
To keep things simple, I dropped it in vertically to the left of the paper towel holder, and locked it in place with some package cushioning. It has been working great:
Truma Water Hammer Fix
Shortly after we got our View, we developed a very annoying “racket” associated with the water pump operation. I don’t know exactly when it started, or why it started, but at first I thought it was the pump making the noise. In the 24J, the water pump is tucked up under the bed, near the back wall. I went in there to have a look, but discovered that while the bed was up I could trace the hammering to the Truma water heater. (With the bed down, it was not initially apparent where the source of the problem really was.) I tried my best to adjust the pressure switch on the pump to play with the cold water delivery pressure, but the best I could do was make the hammering intermittant. I reached out to Truma for some help - and they advised me that they had seen this before - and they had a fix! They told me that the water pressure was too HIGH, and I needed to install a pressure regulator just before the inlet to the water heater. Yes… they did indeed sell one that would cure the problem - and they would ship one to me right away. (This part is not available in their online store - you have to give them a call.)
The regulator, when combined with the PEX fittings you need, is about six inches long - too long to fit comfortably just before the cold water inlet to the heater in our 24J. (I wanted to make sure that I installed it where it would only affect the water heater, and none of the other cold water users.) To compensate for the short PEX run available in this location, I added an extension just downstream of the Winterization Valve # 1, using some RV 1/2” braided nylon flexible hose and looping it back into the inlet for the water heater. Doing it this way saved me re-designing the cold water run in that area of the RV.
This photo shows the extension I added to the run between the Winterization Valve # 1 and the inlet to the water heater, with the Truma pressure regulator at the end of the loop:
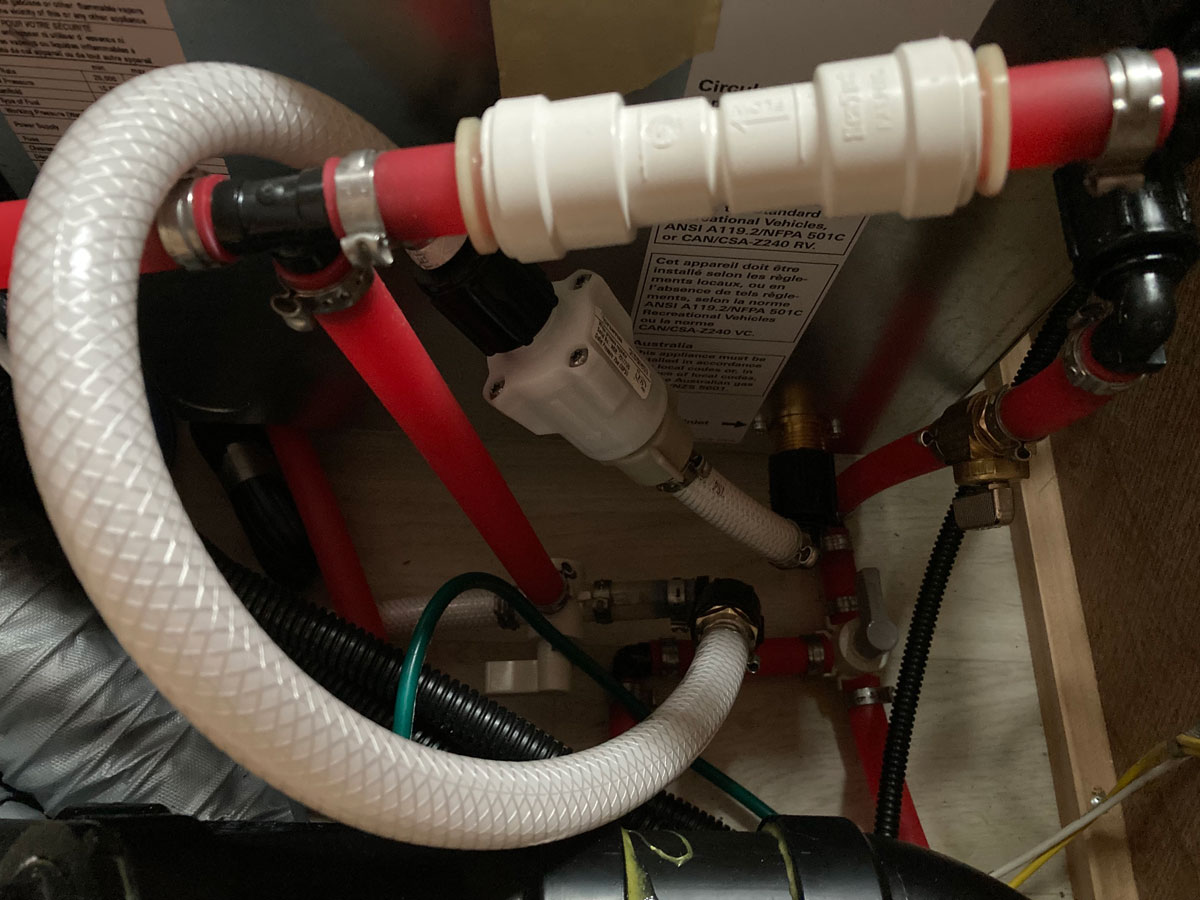
This shot is a close up of the connections at each end of the extension loop:
After installation, the Truma water hammer was gone and the pump can be heard to be running very quietly.
More Locker Space
We had an annoying vibration going on while driving, that seemed to be comming from the driver’s side exterior. I traced it to a sheet metal false wall that was not secured correctly in the centre locker, and while getting ready to secure it so it did not rattle - I decided to look and see what it was actually protecting. It turns out it was only there to protect a small run of electrical cable, so I secured the cables out of the way and did away with the false wall. The entire locker is now available to us for storage. The photo shows the screw line where the wall was secured to the floor, and the zip tie I used to keep the cables out of the way:
If you choose to do this mod, I have a caution to offer regarding what you store in that area - the large cable articulated plastic protector loom that you can see in the picture to the top right dissapears up into the floor of the slideout… and actually increases in length as the slideout is extended. I’m not storing anything too tall in that area, to provide for room for the cable loom to “slide” out of the hole in the floor as the slideout is extended. You want the cable loom to have room to travel in and out and not get interfered with.
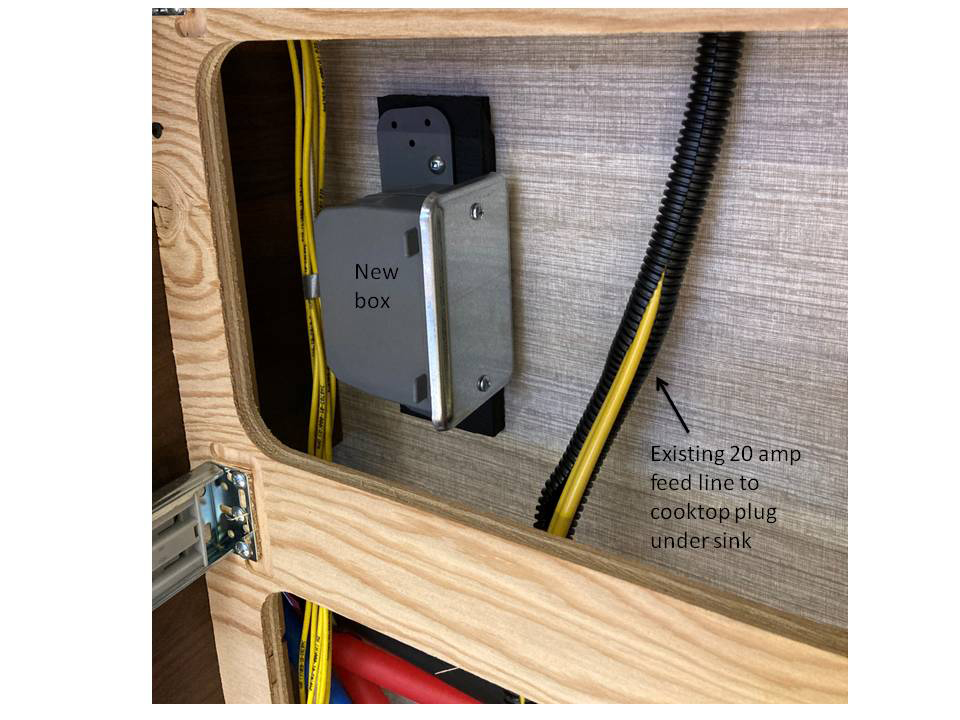
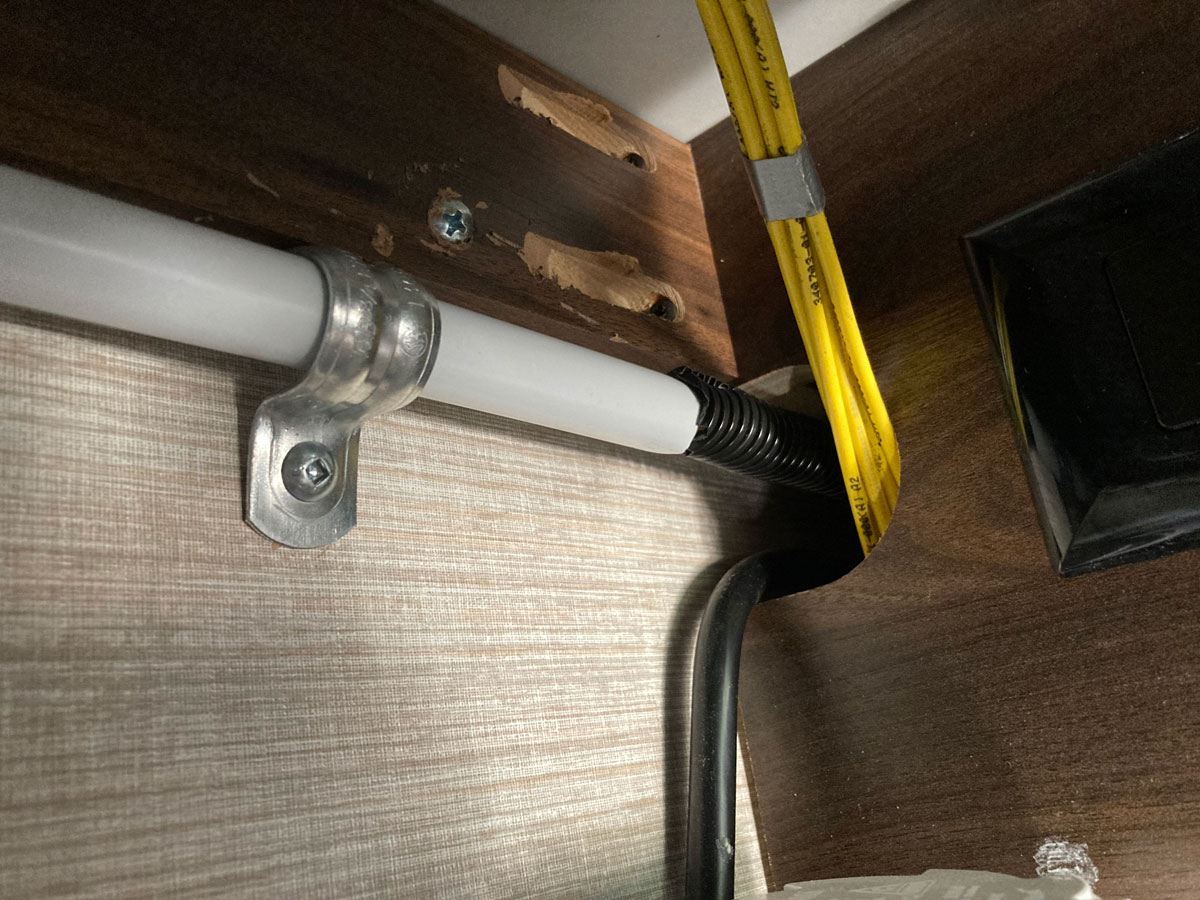
"Bonus" Electrical Outlet
This mod was done in conjuction with the dedicated 20 amp circuit we installed to allow us to run an electric heater independent of the coach’s 30 amp electrical system. See that one here:
We only used one of the plugs in the receptacle for that dedicated circuit, so by making this a split circuit - by removing the hot terminals connecting tab - we had a free receptacle that we decided to hook up to the coach’s 30 amp electrical system. As explained in the “Dedicated 20 Amp Circuit” description, we elected to feed this new receptacle from the circuit that powers the induction cooktop. The induction cooktop is powered from a 20 amp receptacle under the right hand sink.
For this “Bonus” electrical outlet, I started by removing the three drawers under the cooktops. If you pull the drawers out far enough, you will see tabs on each of the glide tracks; depress them and the drawer will slide off.
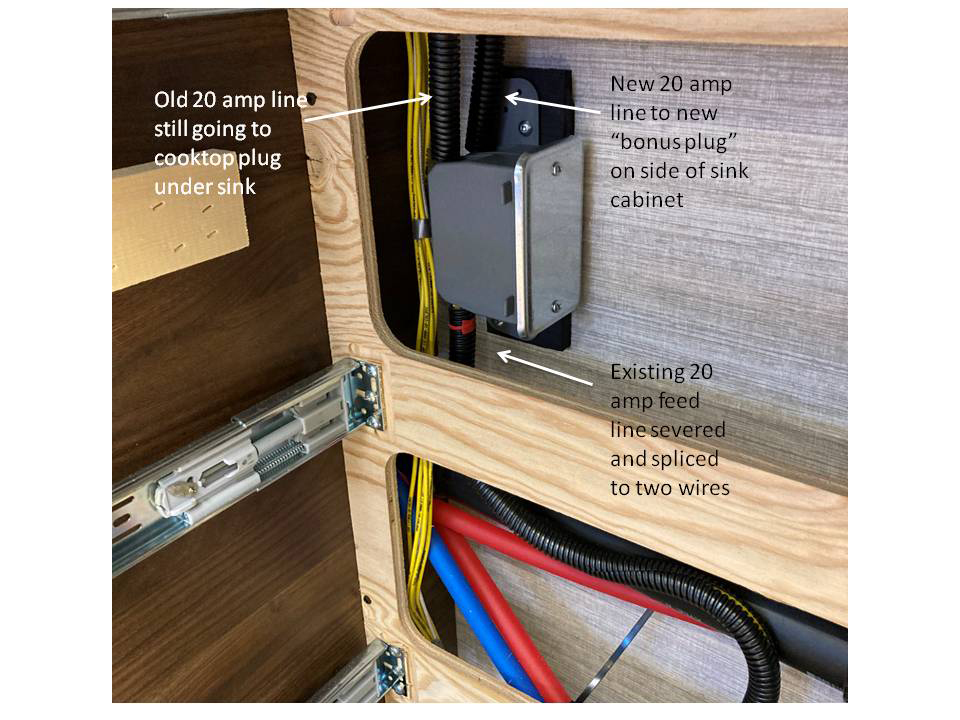
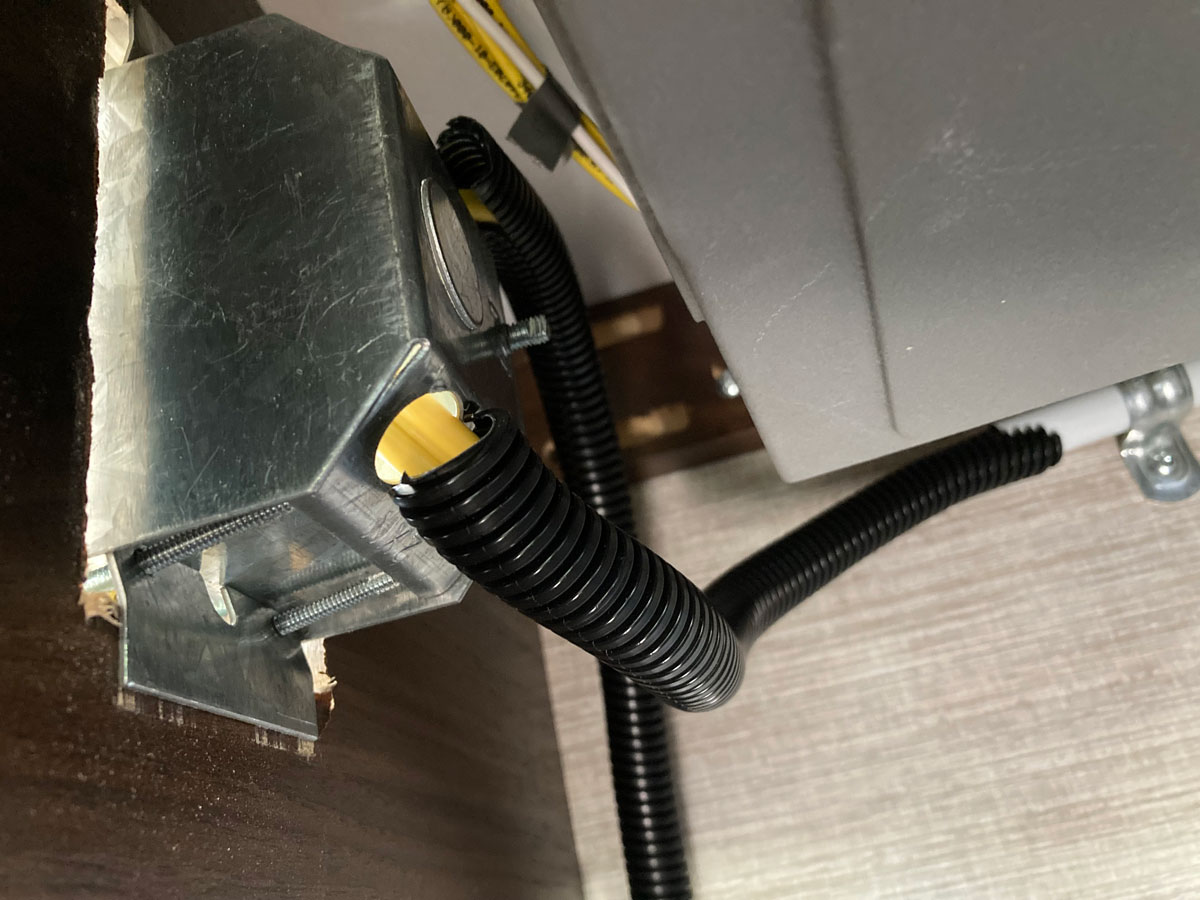
Winnebago has used a slimline RV receptacle for the cooktop plug, and to be honest, I didn’t see how it was going to be possible to get in there to add extra wiring to feed the new plug. Instead, I chose to sever the feed to the cooktop plug, install a junction box under the counterop, and wire in the new 12/2 cable inbetween the feed and the old plug. So, feed line IN to the junction box, and old 12/2 cable OUT to the induction cooktop plug along with new 12/2 cable OUT to the new plug.
Here is a shot of the junction box mounted to the wall, with the feed line to the induction cooktop ready to be severed (To mount the junction box to the wall, I started with mounting it to a piece of painted 1/2” plywood, and then used two part structural expoxy to glue the plywood to the wall):
With the feed line entering the junction box from the bottom, the two lines going to the cooktop plug and the new plug come out the top:
I ran the new circuit along the underside of the countertop:
And then ran it into the new receptacle where it was hooked up to the botom plug:
As explained in the “Dedicated 20 Amp Circuit” description, the location for the new receptacle was partially chosen for its convenient proximity to the lithium battery heater and cab seating:
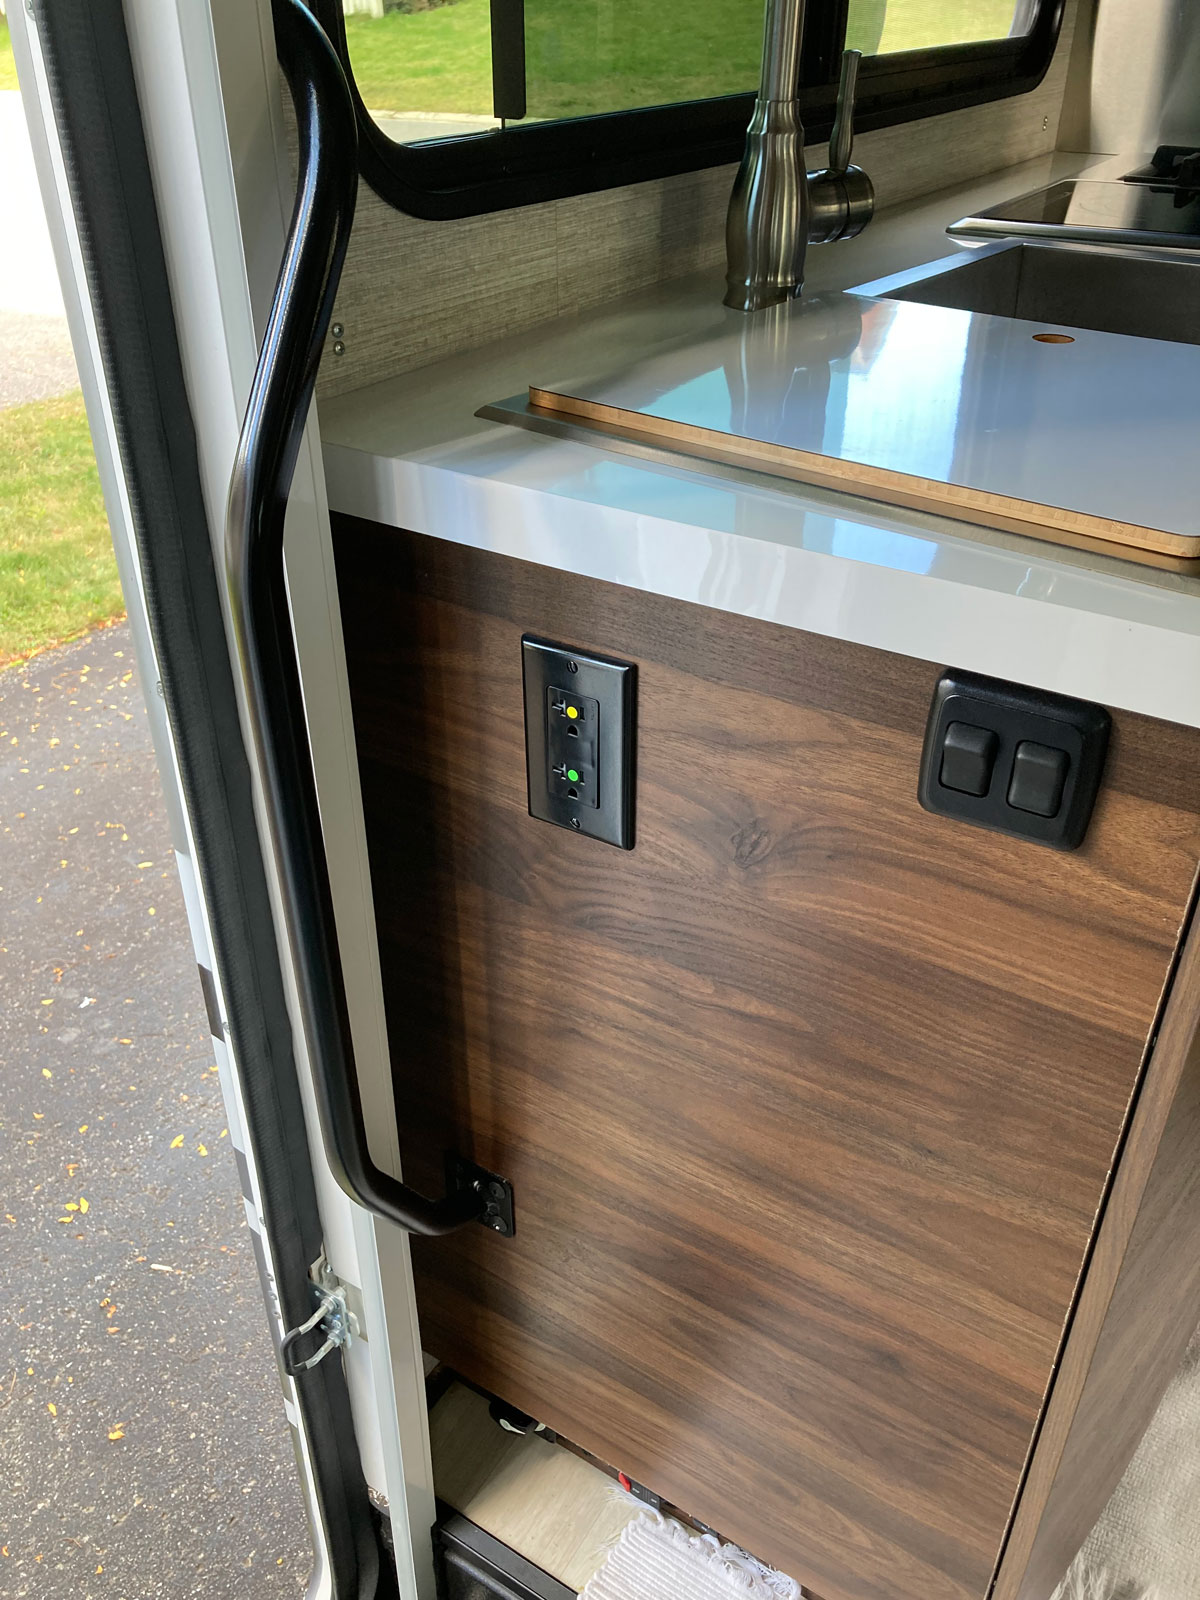
The top “yellow” plug is for the glorified extension chord of the “Dedicated 20 Amp Circuit”, and the bottom “green” bonus plug is hooked up to the coach’s 30 amp electrical system.
Easy Thermal Curtain
On the web you will find many examples of thermal blankets that RVers have fabricated to keep the temperature differential between the cab and the coach as large as possible. We came up with the idea to zip two sleeping bags together to form one large blanket that fit the dimensions of the cab / coach division perfectly. With a bit of overlap on the top bunk held in place by whatever we were storing up there, the thermal blanket really worked well during both summer and winter. We used a couple of old summer sleeping bags we had surplus in the basement, but even with that lightweight protection, we observed the difference in coach and cab temperatures to be really significant.
![]()
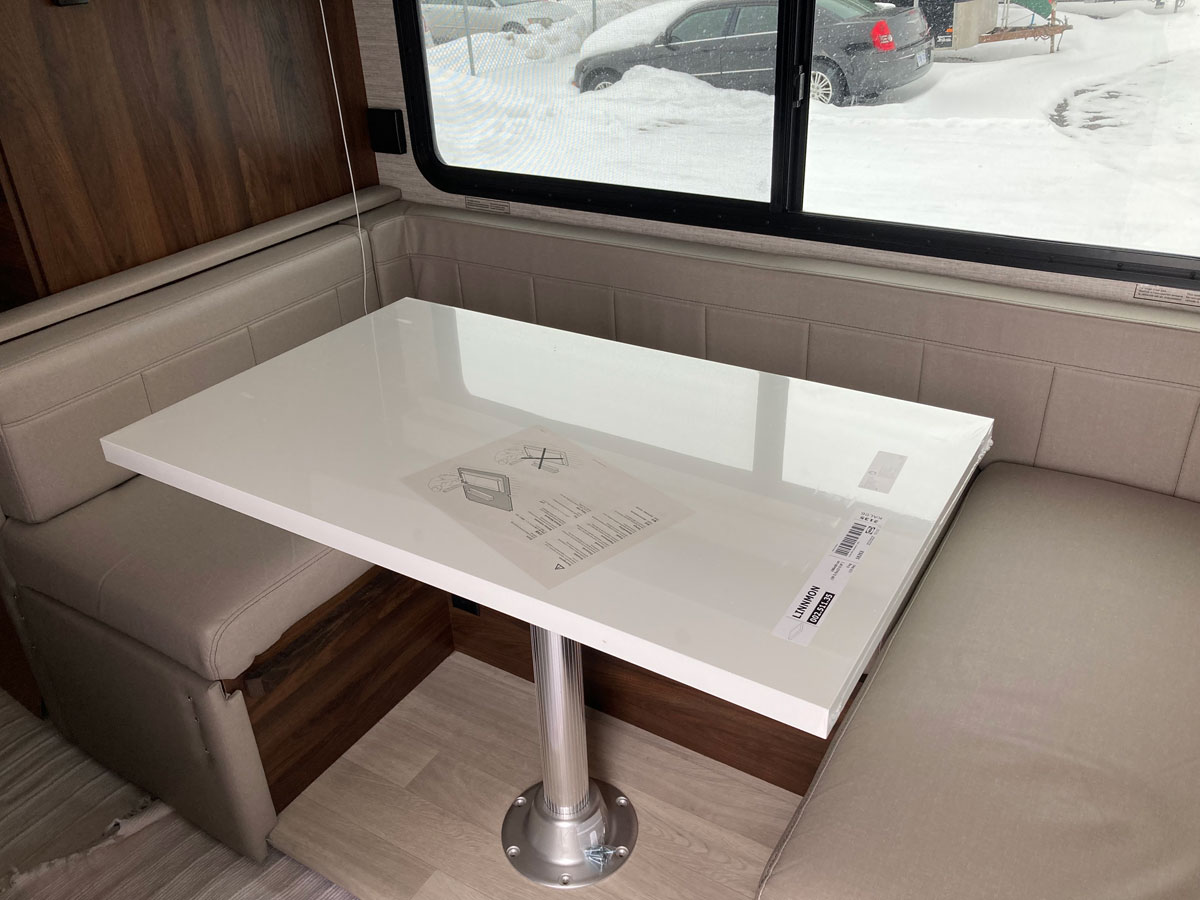
Larger Dining Table
We found the dining table that came with the View a bit too small. We wanted it a little wider for times when it is being used for a games table, and the length longer to allow for a more relaxed seating position. I found a table top from IKEA that made for a pretty simple swap out, with only a little bit of effort. It is four inches longer, and 3 and a quarter inches wider:
The aesthetics work out, as the colour is pretty close to the white tables originally used during the 2020 model year. It matches the coach’s interior well, but there are a few functional notes… because the table is 3 and a quarter inches wider, the side bench top does not open fully without having to compress the seat’s cushion (the fore and aft bench seat tops work fine). Also, because I had to make a platform for the table base to attach to – the table sits about 3/4” higher than the Winnebago table. The last one concerns the original Winnebago table’s use as a piece of the bed support when the dinette is used for sleeping. With the new dimensions of the table, it cannot do that double duty any longer. If we really want to use the dinette for sleeping, we’ll have to carry the old table or make a lighter weight substitute support piece to do the job. Probably cutting a piece of ½” plywood is what I will do for those very odd occasions when we have four on board.
Here is a comparison of the size – The difference is not huge, but enough to make the table more comfortable in all ways. This shot shows the old table sitting on top of the new table:
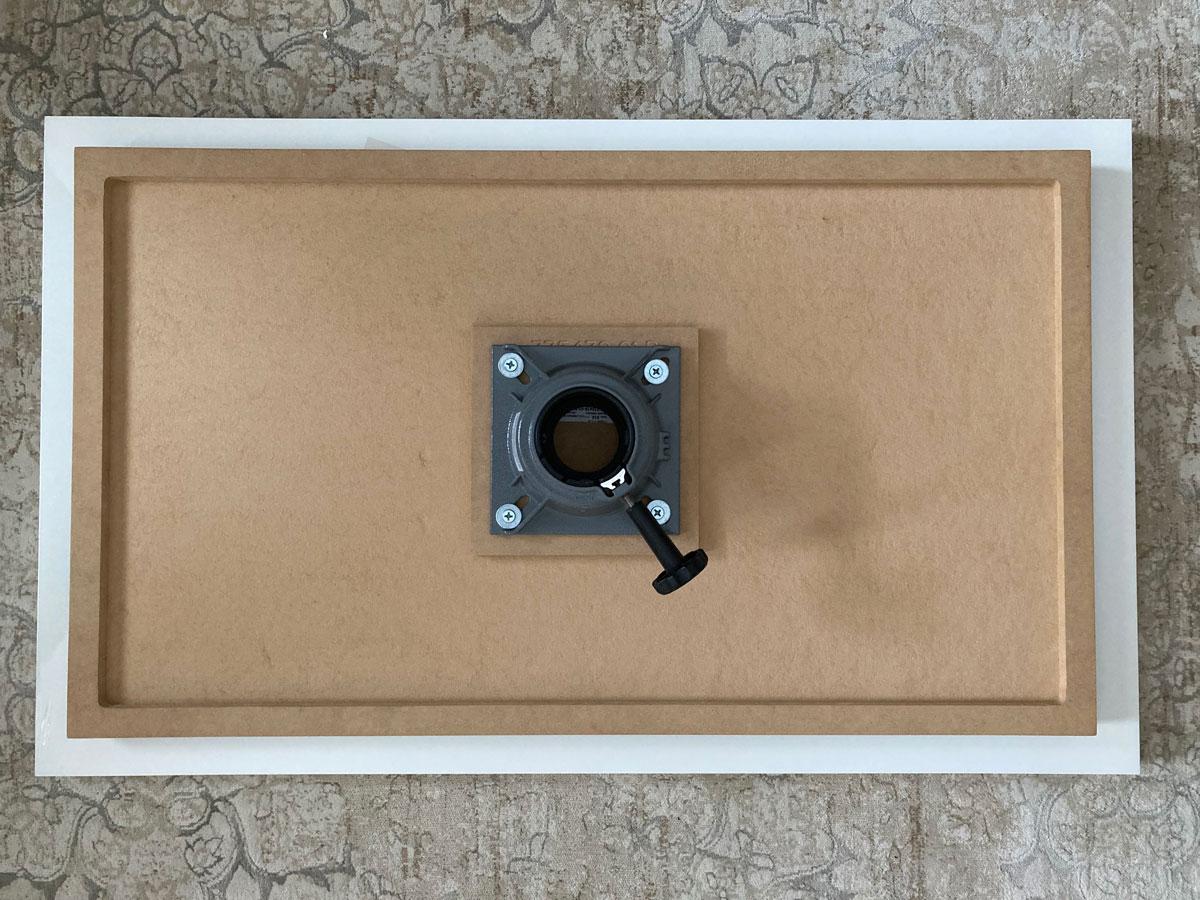
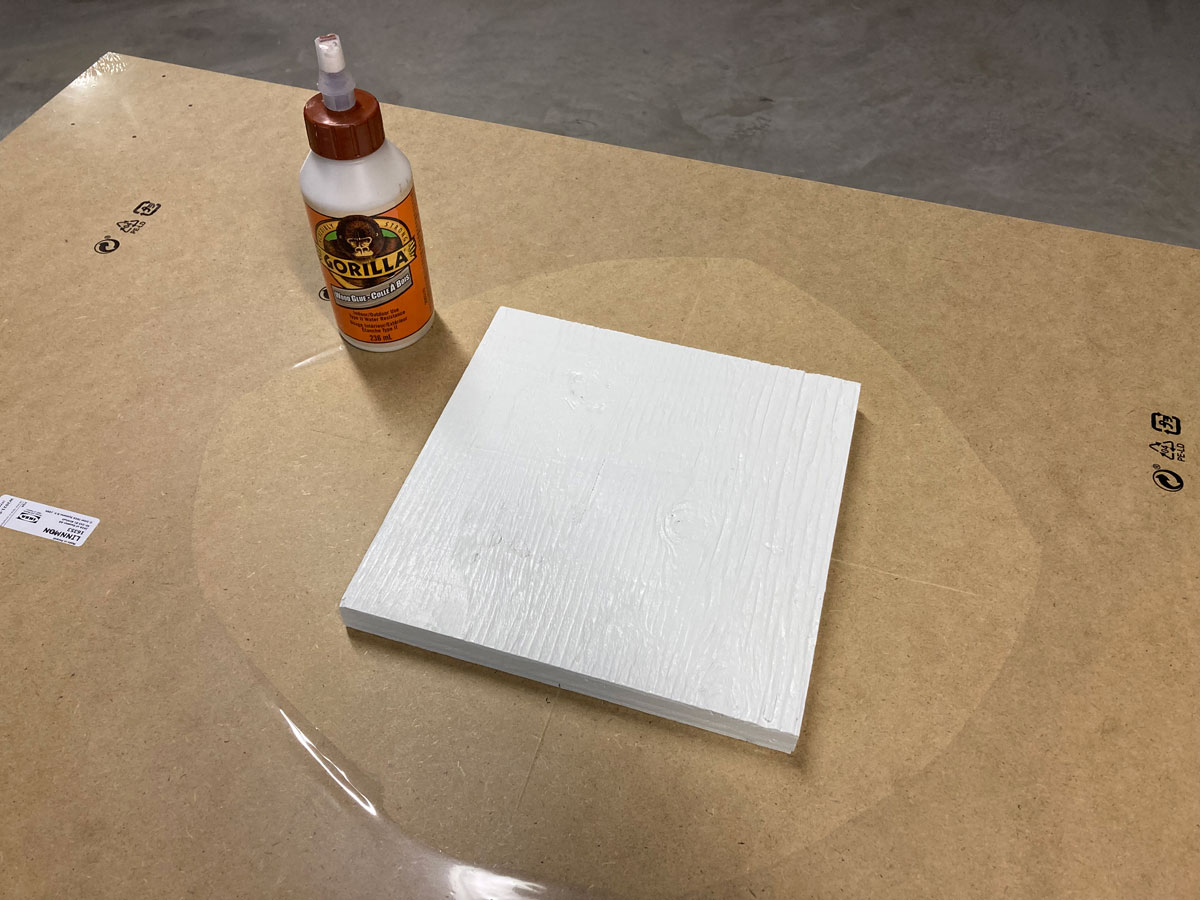
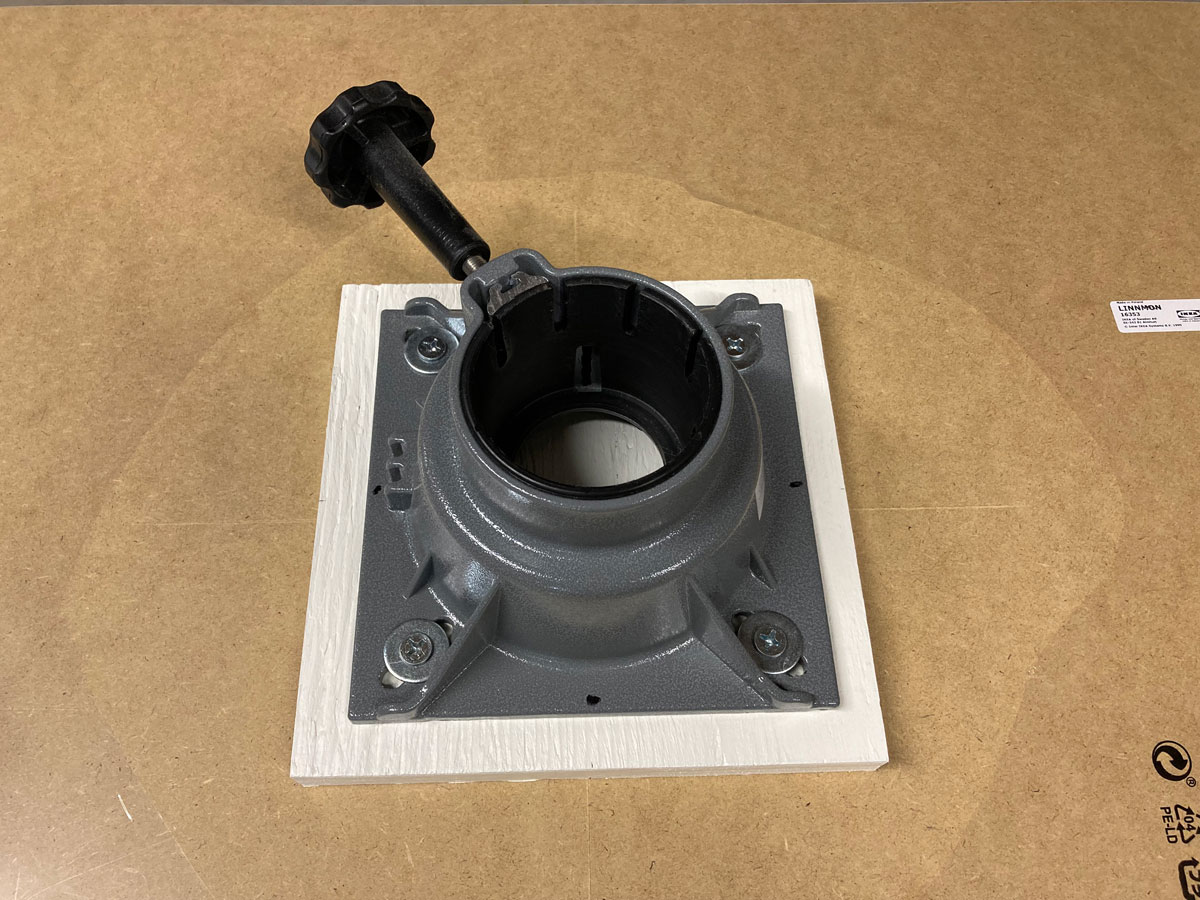
Because the table is hollow with not a lot for the base mounting screws to grab onto, I elected to make a ¾” plywood base plate to make the mounting sturdier. This base plate is 8” x 8”, and was attached using wood glue. It is a solid grip. The thin particle board backing tended to be a bit concave, giving the base plate some trouble with a good seal - so I had to put about 20 pounds on the plate to ensure that all of the glue found table backing to adhere to.
Once the backing plate was secure, swapping out the table attachment was easy:
I’m likely biased, but I think it looks great…
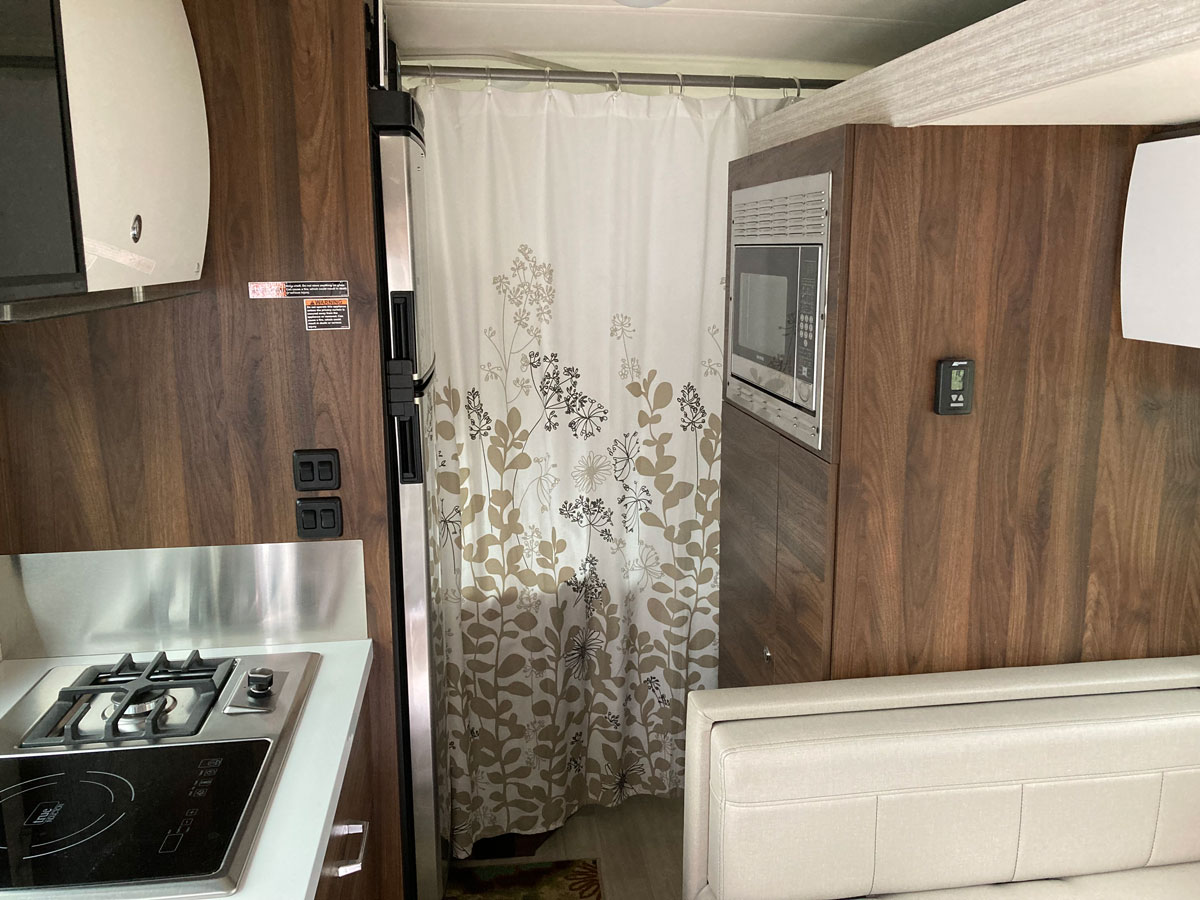
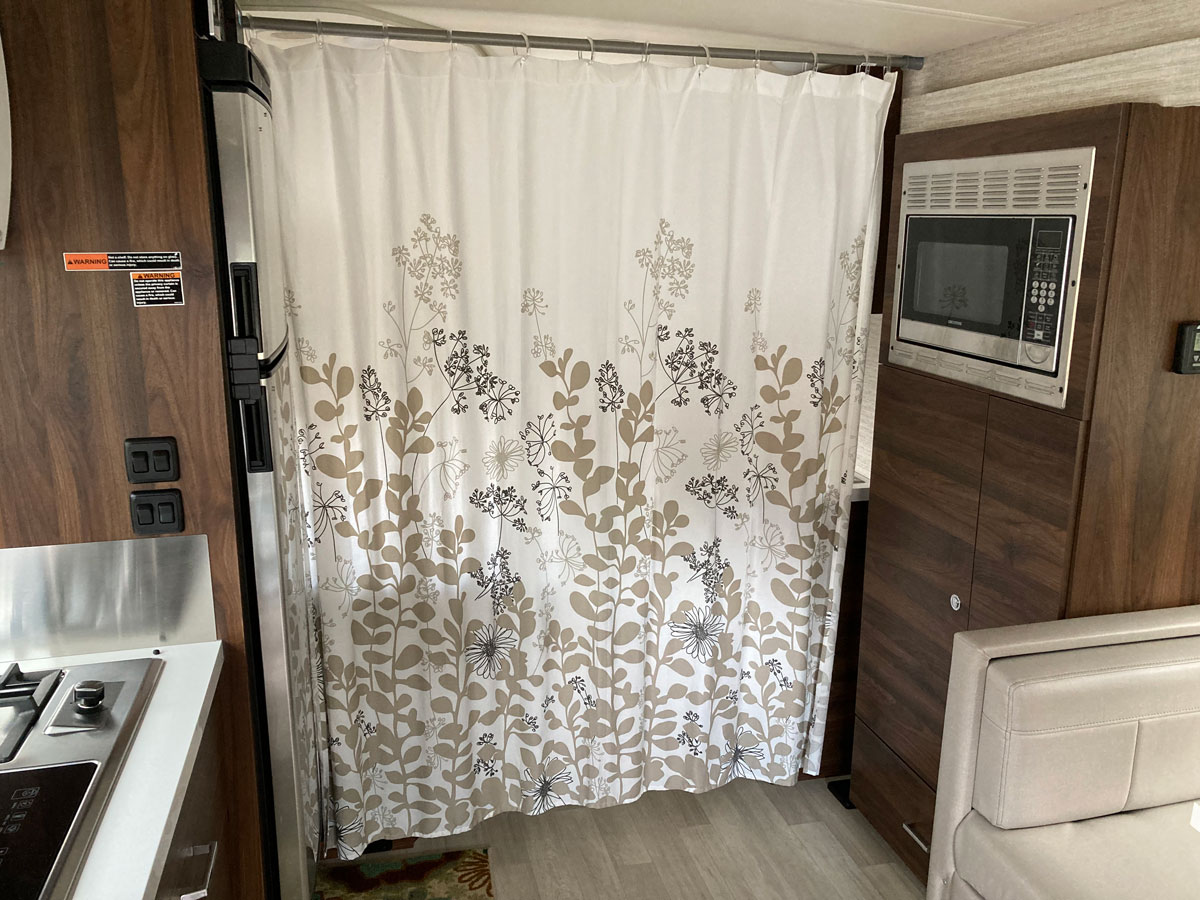
Privacy Curtain
The View J model is a really great floorplan, but it does have its limitations when it comes down to trying to find somewhere to change with a little bit of privacy. Grandpa Ron had the same issue, and solved the problem by putting up a privacy curtain. Here is his simple fix, which we copied:
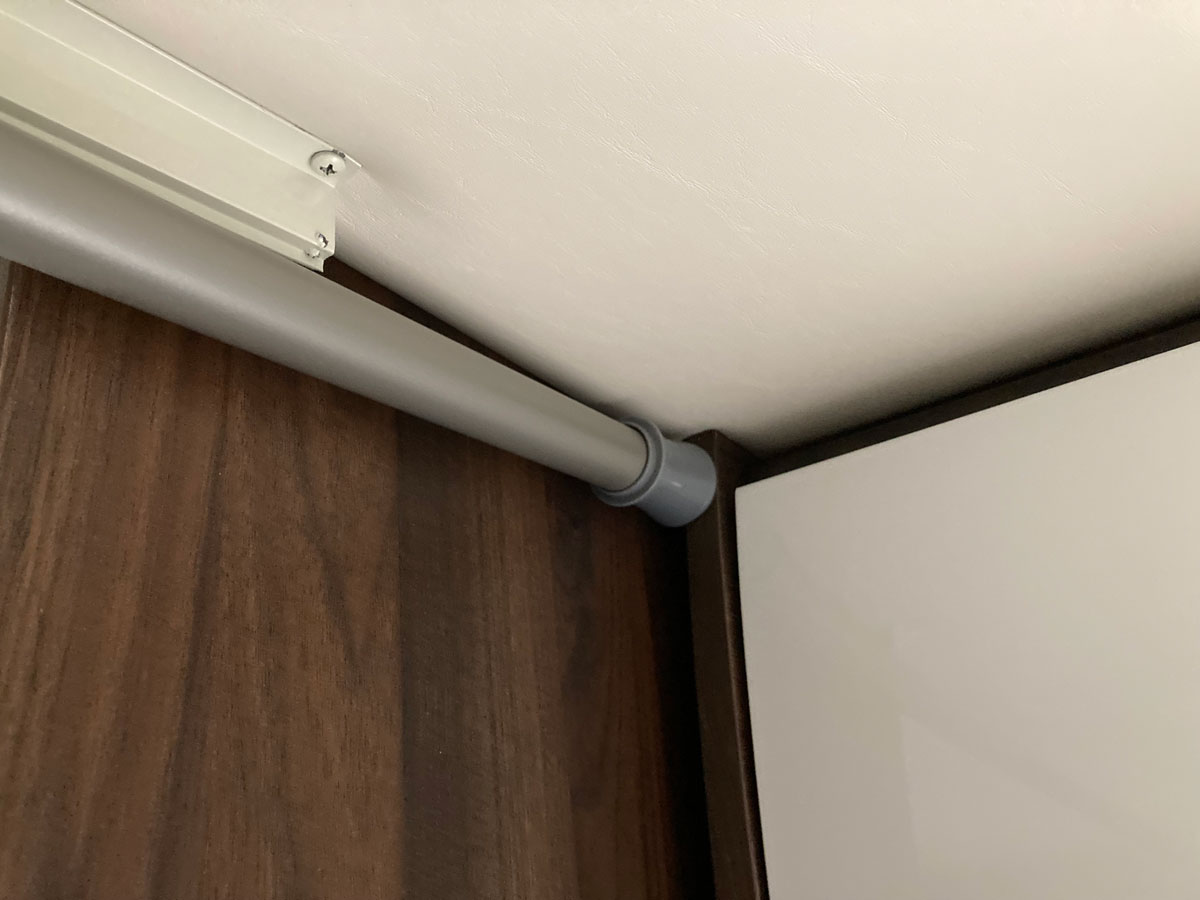
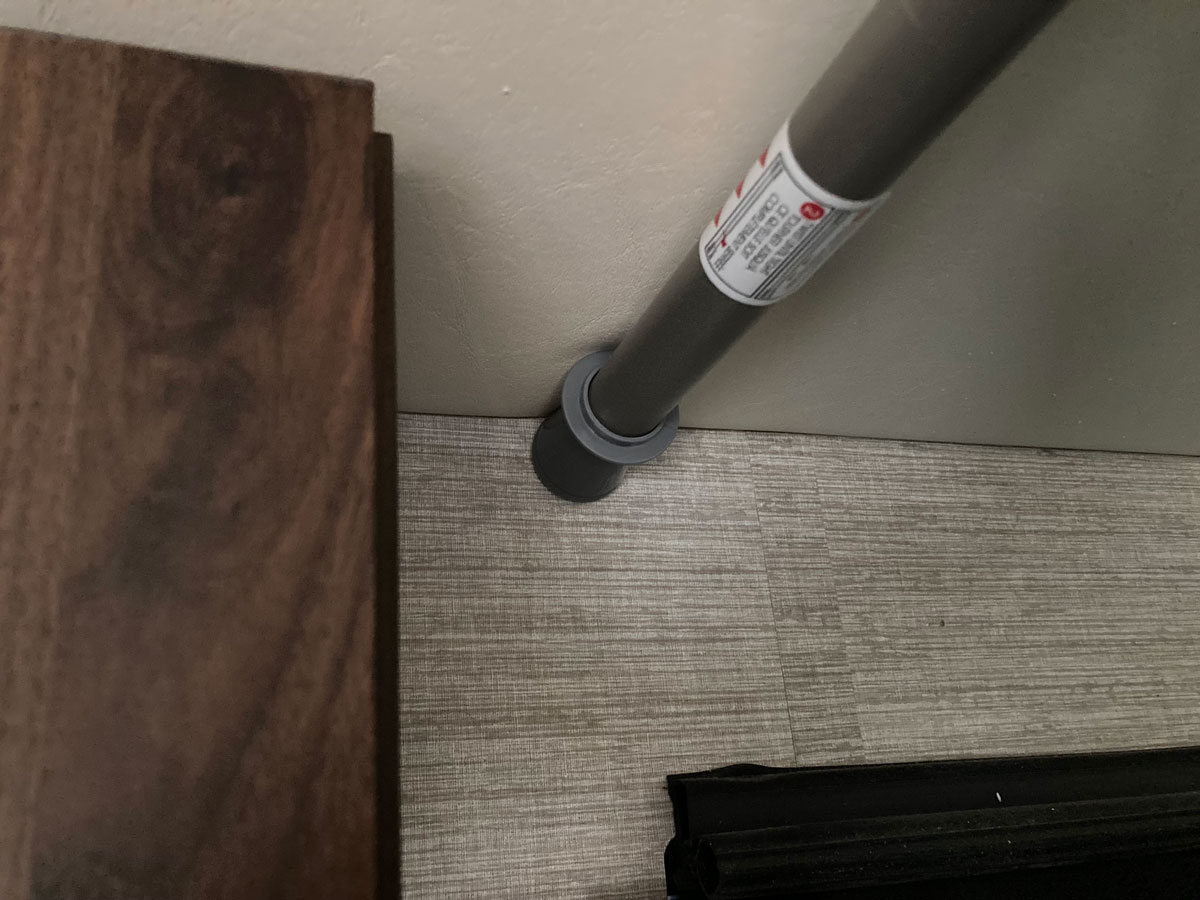
We used a fabric shower curtain cover that matched the Winnebago decor, and bought a shower tension bar that was long enough for the width of the coach. (The tension bar spans the width of the coach, independent of the postion of the slide. I seem to recall I bought the 52” - 86” version.) As Grandpa Ron demonstrated, it was an easy install after that.
The curtain works great with the slide in…
Or with the slide out…
The tension bar’s grip points are shown in these next two photos:
Helpful Counter Space
Here is an easy one that improved the flow of kitchen prep for us significantly. We don’t use the propane grill often, if ever, so had been wishing that we could re-claim the counter space that it was taking up. (We have counter top envy when thinking about the 24D model.) I saw an idea in a Motorhome magazine that used a large cutting board on rubber feet to cover up the grill AND the induction cooktop, but that seemed a bit excessive for our needs. Instead, I found an old shelf that sort-of matched the decor, and fit the dimensions of the grill top:
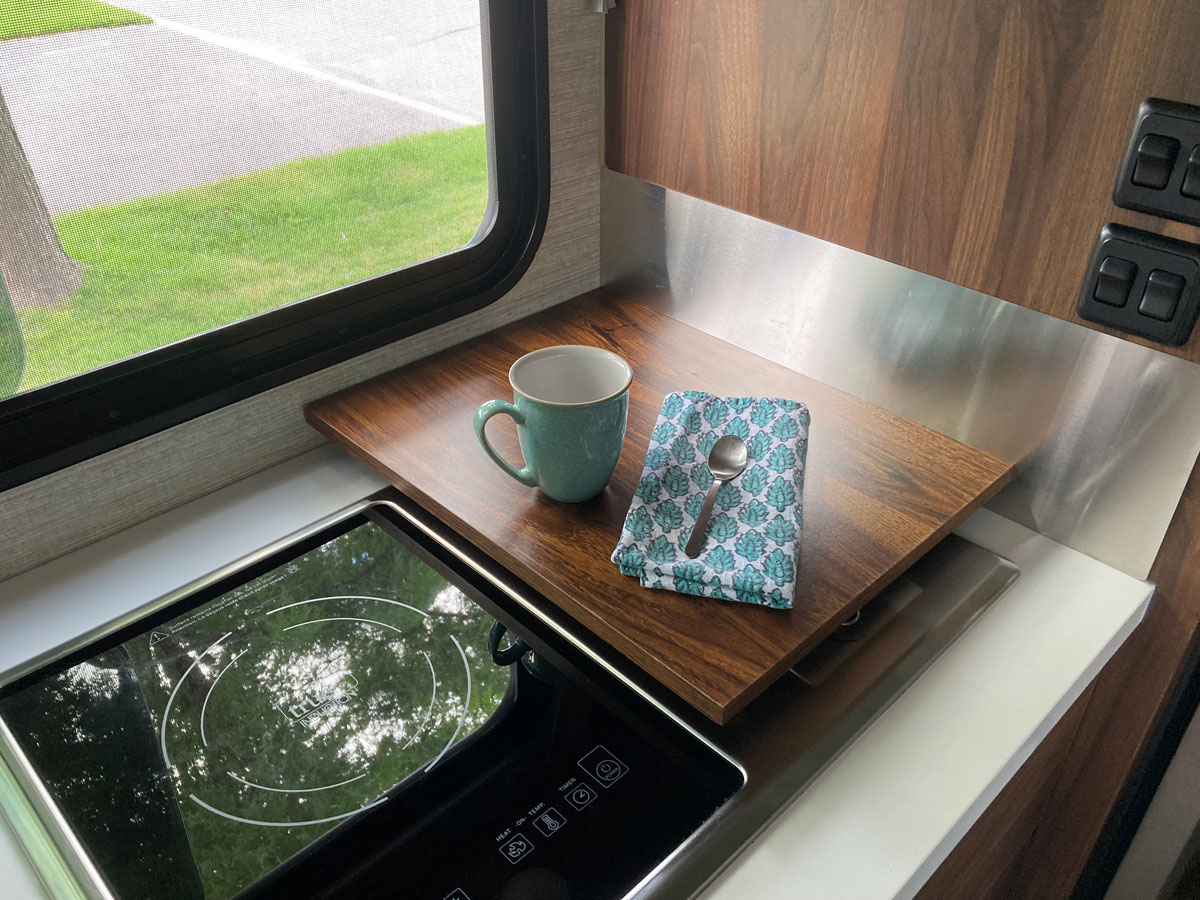
C’mon, is this really a mod? Well, officially it fits the definition - because, I had to remove the rheostat knob in order to allow the new counter surface to lie flat and not cause the propane to start flowing:

We keep the knob in a drawer in case we ever need it, and store the counter surface underneath the sink when travelling. If the shelf had not worked out, my Plan B was to find a cutting board of similar dimensions and stain it to match the interior. (We had been using one of the sink covers to do this job, but having a surface of larger dimensions has made for a more practical work area.) Now, there might be a mod to this mod coming up - you’ll note that if the surface was a bit longer, it would nicely capture some of the unuseable counter top at the edge. Maybe a suitable cutting board, stained to match, with a foot at each end for stability? Hmmmm….
Shower Cold Water Blast Fix
This was an easy fix for a very annoying problem – that blast of cold water you get when you turn the shower head back on as you start to rinse off. I’d gotten in the habit of turning the shower head off and then aiming the shower head at the wall, to prepare for eventually turning it back on. But, why waste the water? And you still get sprayed a bit by the initial blast of cold water…
So, as usual, James at the FitRV has been way ahead of me for years. I knew he had solved the problem a while back, but I only recently got around to searching for his fix. His solution involves two components: a shutoff valve that does not intentionally leak, and a one-way check valve attached to the hot water line. My solution does not involve the one-way check valve on the hot water line, but have a look at this post from the FitRV to see James’ full mod:
The FitRV Solution to shower cold water blasts
I purchased both of the recommended components, but while I was waiting for delivery - I did some more thinking. With a shutoff valve that is intentionally designed to leak, I can see how higher pressure cold water would continue to force itself up the shower head hose and leak out. The result is the shower head hose gets full of cold water (if your RV, like ours, has higher cold water delivery pressure than the hot) and upon opening the factory shower head shutoff valve to rinse off, the hose has to empty of the cold water before you get some hot water back in the hose. Sure, I get that.
But, we’ve got a Moen residential type shower faucet control in our View… so why would that be any different than our shower at home when it comes to requiring a check valve in the hot water supply? As a test, I installed the new shutoff valve on a home shower to check this theory, and sure enough, found that both hot and cold water remained in the shower hose and the plumbing leading up to the faucet control, just has it had been left. I’m thinking that James’ shower controls on his Travato might have set him up for needing a check valve installed in the hot water line, but on our View it is not required – all we needed was a real shutoff valve. No more leaking shower head with a hose that is filling with cold water – this new shutoff valve is a solid closure and traps shower temperature water in the hose. And, our View’s plumbing configuration does not somehow let the cold water overpower / back-drive the hot water in the coach’s plumbing system, so no matter how long your lather-up is you will always have shower temperature water when you open up this new shutoff valve.
If you’ve got a View / Navion there is a good chance all you will need is one of these, from the link below, to solve your “blast of cold water in the shower” problem:
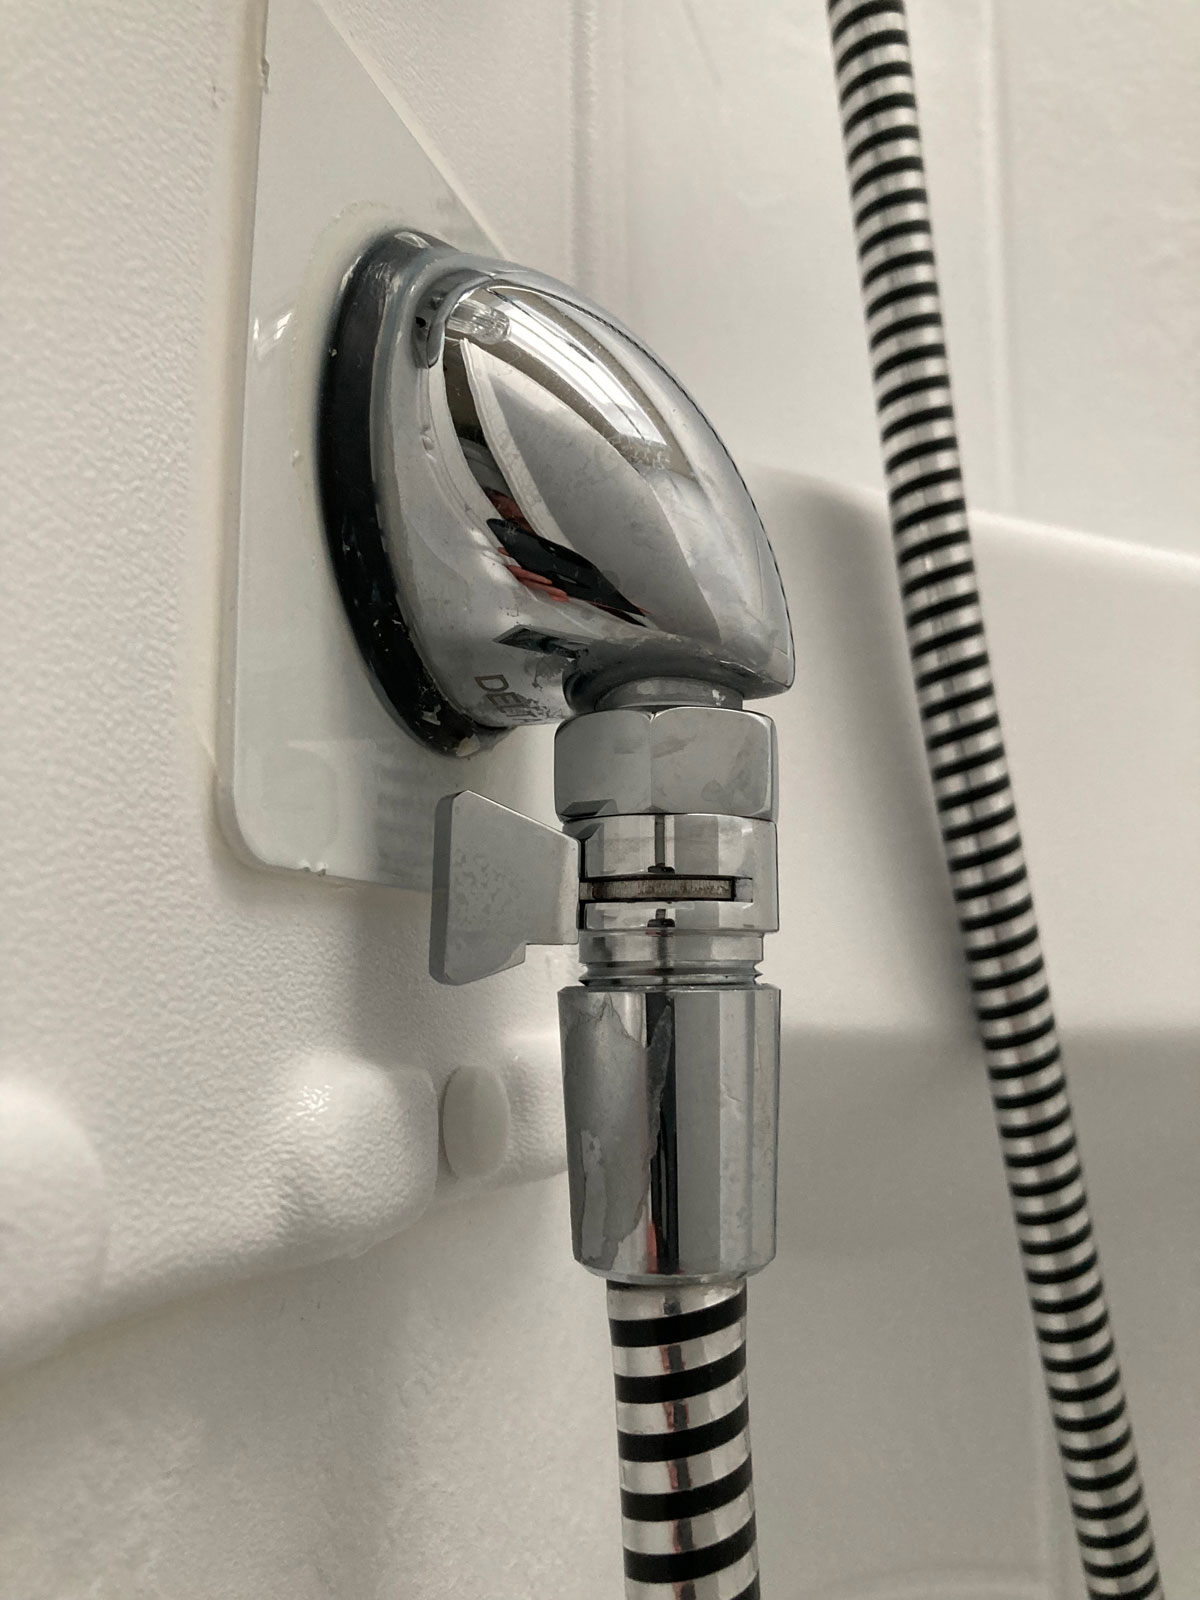
It works great!
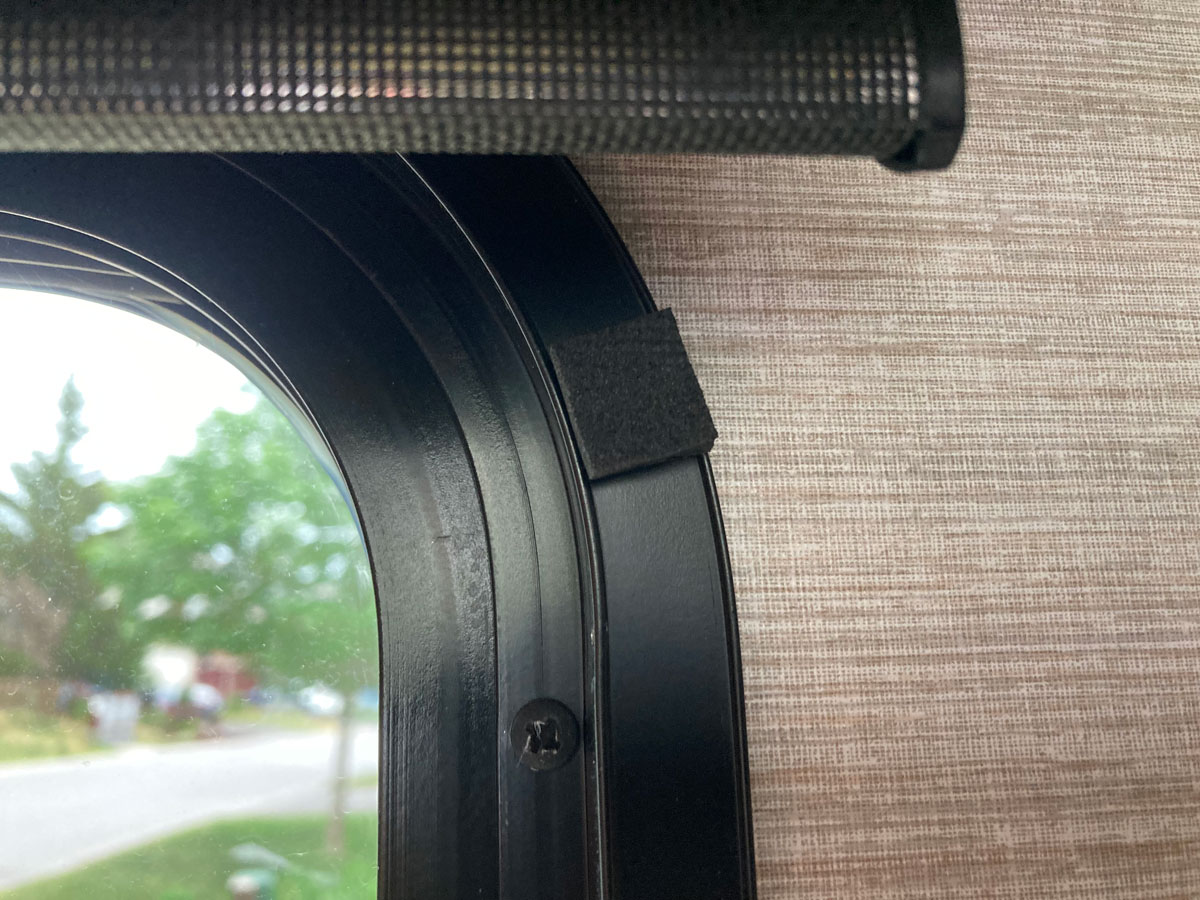
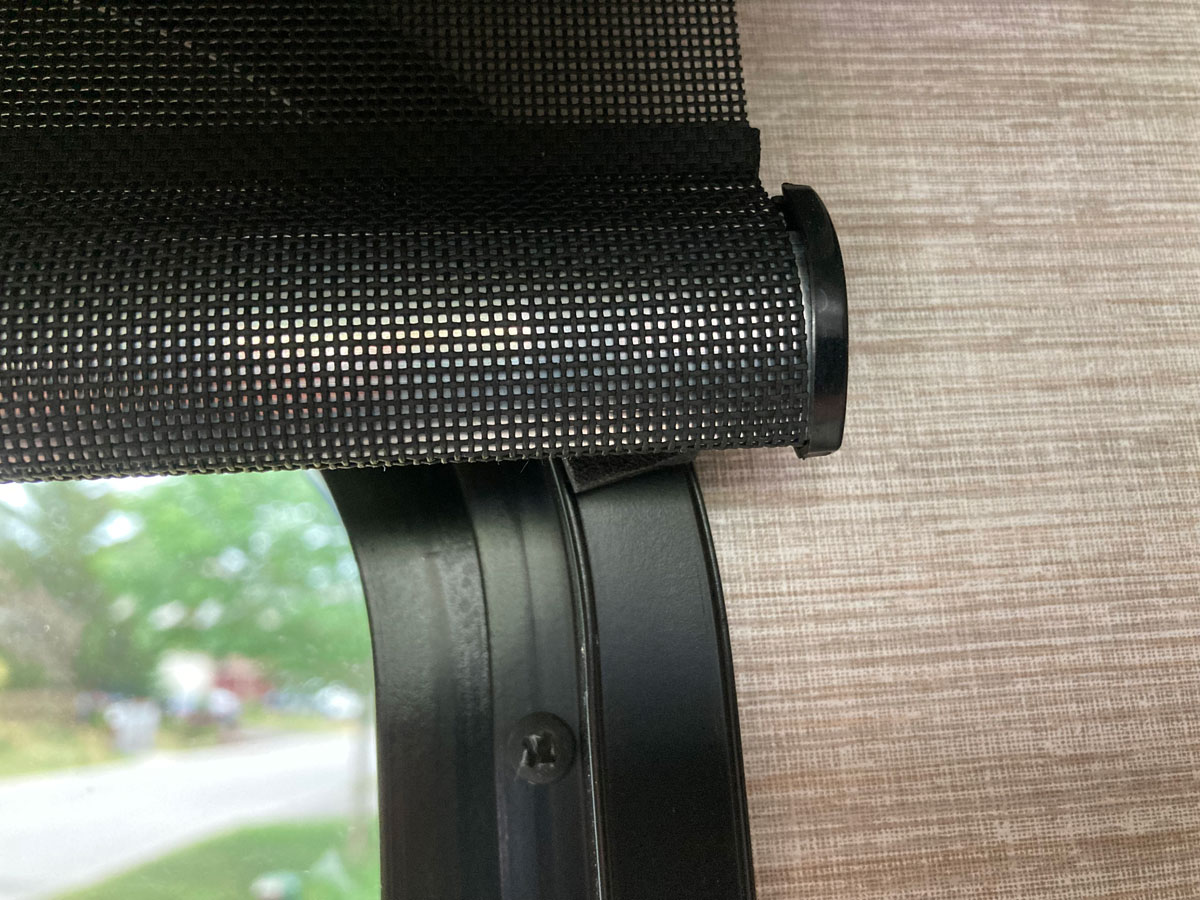
Roller Shades "Thumping" Fix
Here is another easy one - stop those shades from thumping on the window frame as you drive around on your adventures. Adding a square of adhesive backed foam to the metal frame solved this one. We also had the same problem while sleeping at night, with the bedroom window open and the blind down. Sometimes the wind would cause the blind to bounce around and cause the same annoying distraction. Same problem, same fix! (This also worked well on the kitchen blinds, too.)
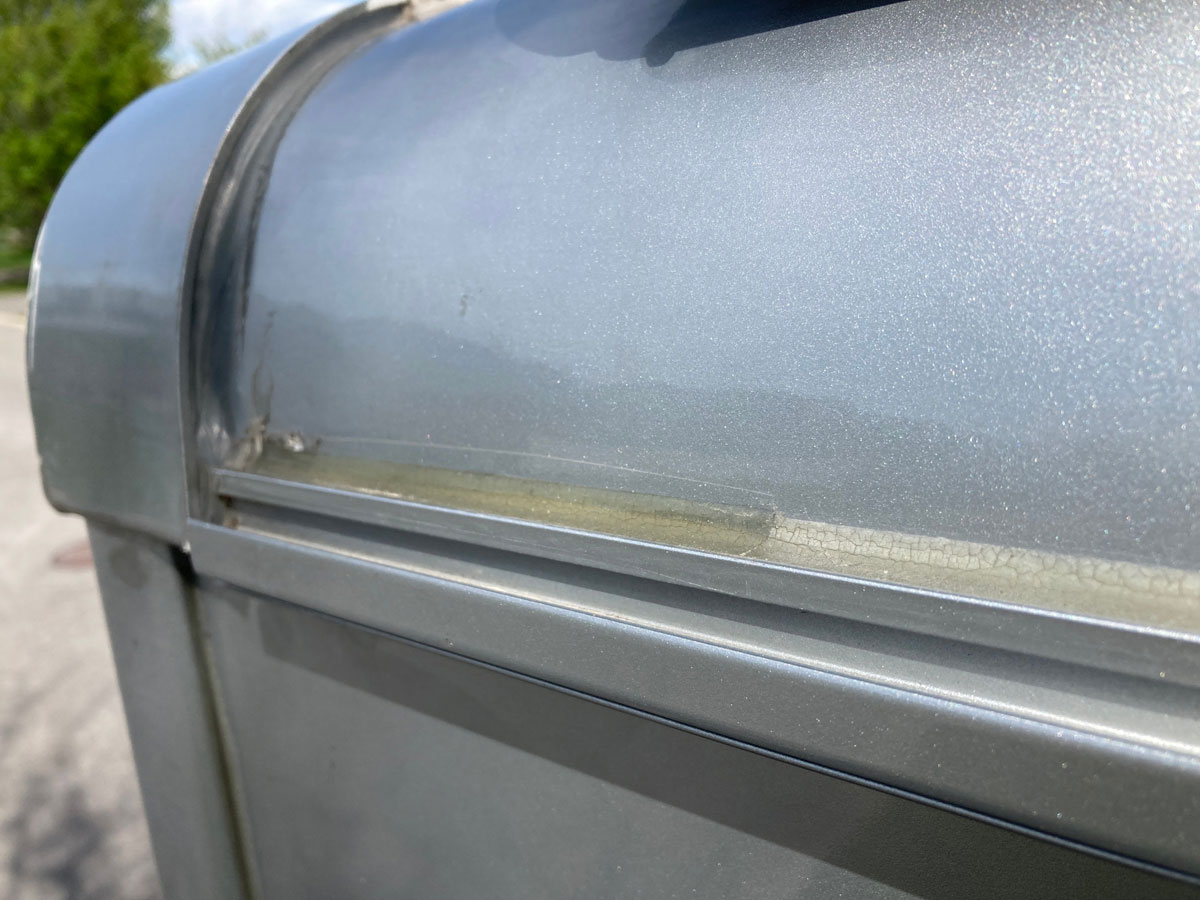
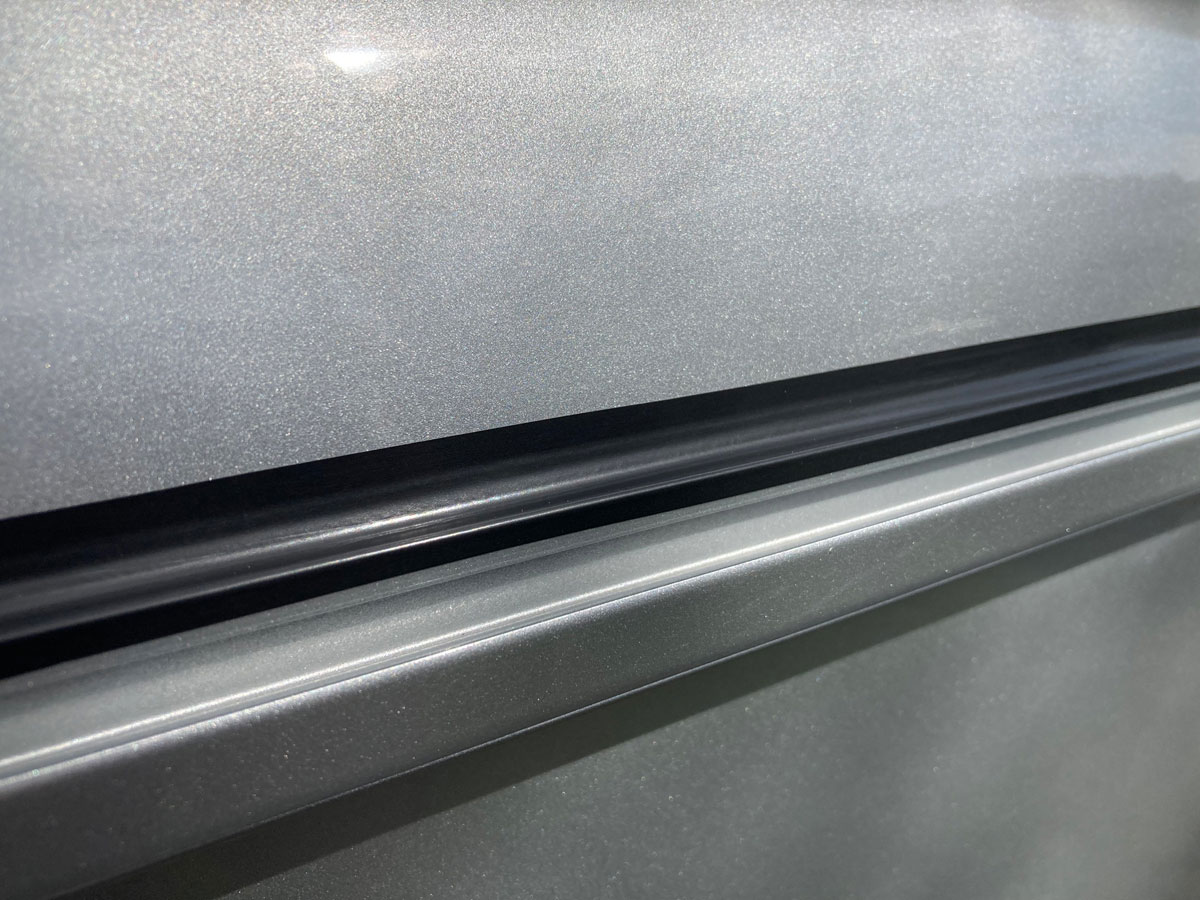
Roof Radius Protection
Shortly after we got our View, I began researching what we needed to do to help protect our investment. A YouTube video entitled “The MOST Important Inspection on a Winnebago Roof” caught my immediate attention, and drew me into the world of worrying about a Winnebago roof. Who knew that the fibreglass Filon sheet on the surface of our roof was only held in place by tucking the edges along a lip running on the sides of the coach? Who knew that the tuck is secured to the coach with a thick wad of sealant? Who knew that the sealant weathers over time and needs to be replaced, or our roof might decide to depart the coach while we are driving down the highway? And, who knew that the removal and resealing of this lip sealant is a pretty big job? Well, I certainly didn’t know any of this.
If you are not familiar with Winnebago’s method of attaching the roof to the coach, or the method of ensuring it stays there, have a look at this video from a maintenance facility in Arizona – it is well worth the twenty-five minutes that it takes to watch:
The MOST Important Inspection on a Winnebago Roof
Our ’21 View has the same roof attachment method that this video highlights, so the material was extremely enlightening to me. But, as with other things in life, it took me a couple of years to get around to really thinking about this. When I did finally get around to thinking about potential problems with this design, I had one question: “If the sealant that ensures the Filon roof remains tucked in the coach gutter can fail under the influence of weathering and the sun’s UV light, why has Winnebago not protected the area?” “Can I protect the sealant to extend its useful life?”
As usual, I came up with some pretty elaborate and impractical ideas of protecting the sealant – but in the end decided that some PVC electrical tape covering up the roof radius attachment might just do the trick. Simple, and easy to install…
Before I went to the trouble of applying 30 feet of electrical tape to the roofline of the View, I elected to try a six inch test patch to see if the tape would hold and if it would actually make a difference. Late one summer, when the View was two years old, I applied the test patch and then waited for the following spring to have a look. Over the winter the View was parked with the test patch facing the sun, and was operated that winter season in the rain, snow, and salt. When I had a look at the test patch after approximately nine months, I was surprised at what I saw. The tape had held up just fine, and the protected area was markedly in better shape than the unprotected area. There was a very noticeable increase in weathering of the unprotected sealant, so much so that I got busy right away protecting the rest of the roof radius sealant.
Have a look – The sealant on the left was protected for nine months, the sealant on the right was left open to the elements and the sun:
How long does the roof radius sealant on a ’21 View normally hold up, if you just let it sit out in the open? Well, I don’t know. Five years? Ten years? Fifteen years? Not sure. But I do think that it will last longer if protected from the sun’s UV rays and the various weather conditions that a motorhome will face during four season use.
Is there a down side to adding a run of PVC tape over the roof radius gutter on our View? Based on my nine month test, I can’t think of one. All I had on hand for my installation was black PVC tape, but when it comes time to re-apply the tape in a few years I’ll likely use white PVC tape in an attempt to keep the gutter cooler. But, so far that is the only consideration I can think of. If you come up with something, let me know.
The black tape blends in well with the roofline of our paint scheme; I don’t think it would be noticeable to anyone but myself:
The job used about 2/3rds of a roll of tape, and took about an hour. A small price to pay for perhaps pushing off a bit of very awkward roof maintenance that would certainly take me a couple of days to accomplish…
Another thing I experimented with a bit was adding some rubber conditioner to the gutter sealant. As you can see in the first picture above, the unprotected sealant’s surface is starting to powder and crack, and I wanted to see if the conditioner would revitalize the compound to prevent this powdering. I sprayed on common RV rubber conditioner on a small area of the roof radius, and it immediately returned the sealant to looking like it had just come out of the caulking gun. So, the results looked promising but I was a bit hesitant to spray the rest of each roof radius without knowing what the long term effect of the conditioner would be on the health and structure of the sealant. I reached out to the manufacturer of a similar product to what I thought Winnebago was using, but they would not give me any assurance that a rubber conditioner would do no harm. Without knowing what the Winnebago roof radius sealant is actually made of, I think I will just wait for a bit to see if my small test patch deteriorates with the passage of time. I could not find any references on the web to folks using rubber conditioner on RV sealant – that too makes me wonder. If you have some experience with this, drop me a line, thanks.
Kitchen Towel Rod
Here is a straightforward mod that might work for those who do not use their one burner propane grill. If you do use your grill, this one likely does not make sense. But, for us, who don’t grill indoors and have never used that one burner grill - this mod added quite a bit of functionality to the kitchen of our 24J View.
A towel rod. Brilliant.
Here is the one we settled on:
Kitchen Towel Rod from Walmart
The adhesive backing is strong, and the rod was easy to install. Instead of using a level to get it straight on the wall - as with anything in an RV - I aligned it with something I knew was straight - in this case, the top lip of the stainless steel heat shield. (As you know, using a level in an RV is prone to error, as quite likely the RV is not level to begin with…)
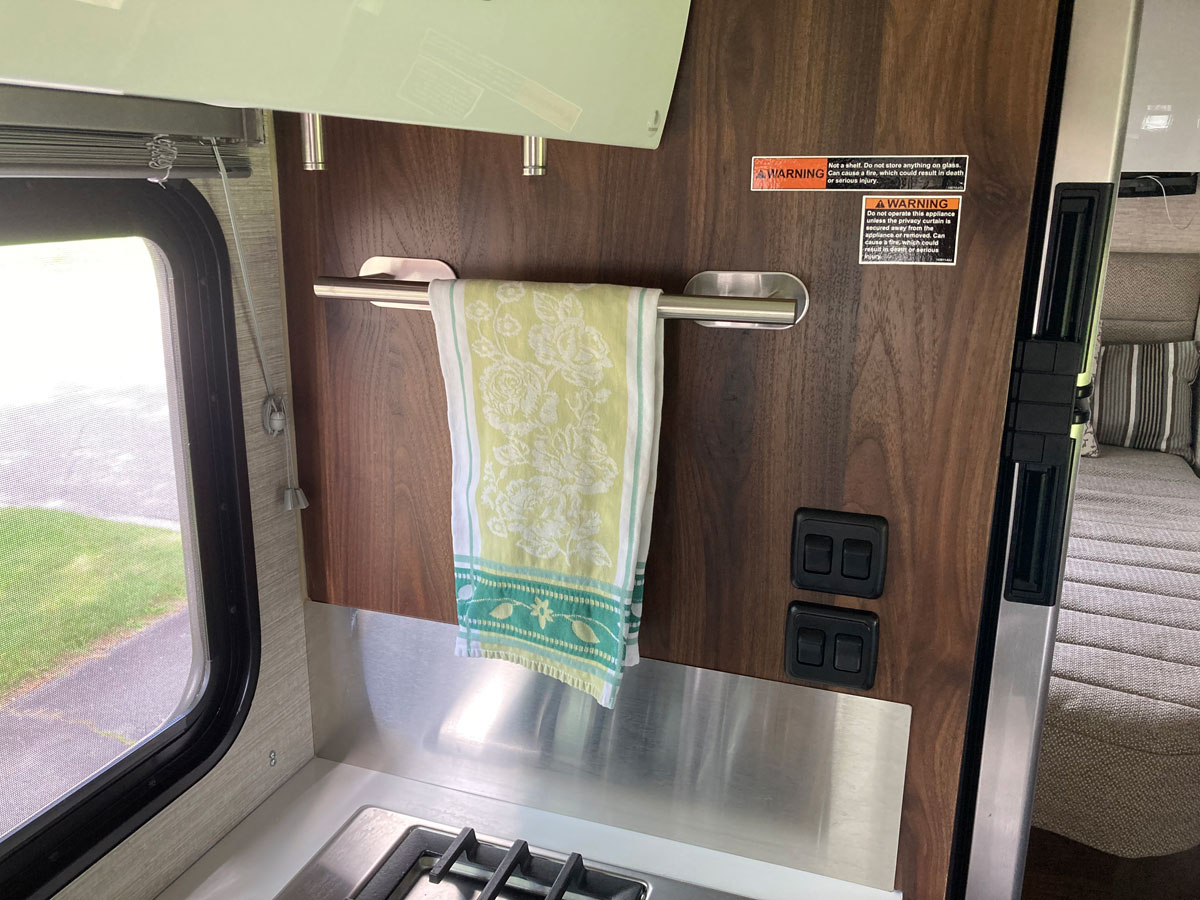
It looks good and works well.
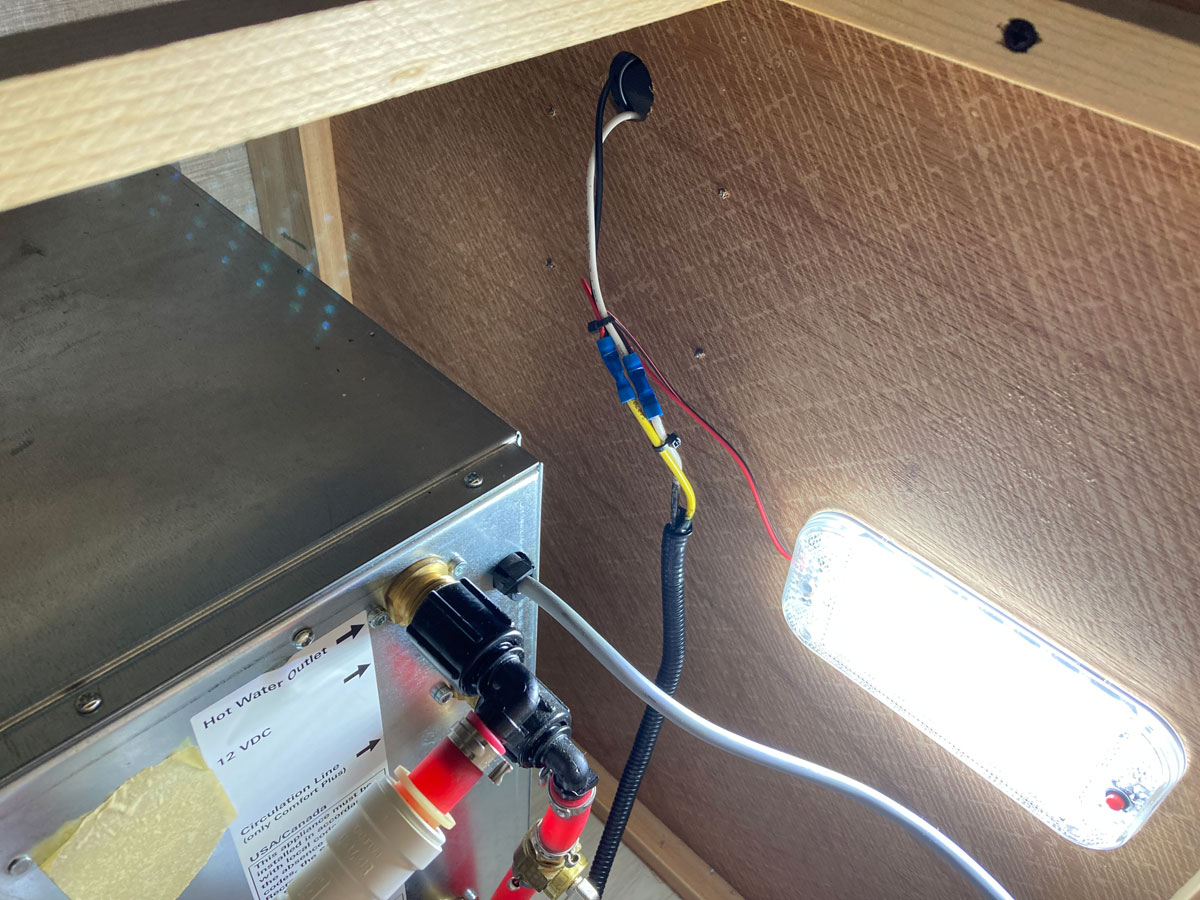
Task Lighting in the Truma Box area
This easy mod was installed to light up the Truma box and associated plumbing under the corner bed - during times when I needed to access the winterization valves or have a look for water seepage in the area. A flashlight is almost as good, but not as fun.
There is a 12 volt lamp on the other side of the Truma box’s aft wall used in the underbed storage compartment, and its electrical wiring is fed from a Winnebago 12 volt feed from the Truma side. It was straightforward to tap into this wiring with the leads from a 12 volt LED lamp I found on Amazon:
The yellow Winnebago 12 volt feed and its companion white ground were easy to spot, and I used butt connectors to attach the existing storage compartment lamp and the new LED lamp to these wires:
Induction Cooktop Power Switch
I don’t know about you, but we found the nuisance of the induction cooktop powering up everytime the microwave finished working … a bit of a pain. Not only would it “beep” upon powerup, after the microwave load shedding was complete, but it would be standing by to be accidentally turned on while preparing food in the area. On one occasion, after it was accidentally activated by some inadvertent hand positioning, some cutlery on the cook surface caused the heat to turn on and before we knew it - things were starting to get hot! From that point on we started unplugging the cooktop from its 20 amp receptacle under the sink, but even that was a bit arduous as it required digging out a flashlight and getting down on the floor. We decided to install a switch that the cooktop cord could plug in to; a switch we could operate just by feel.
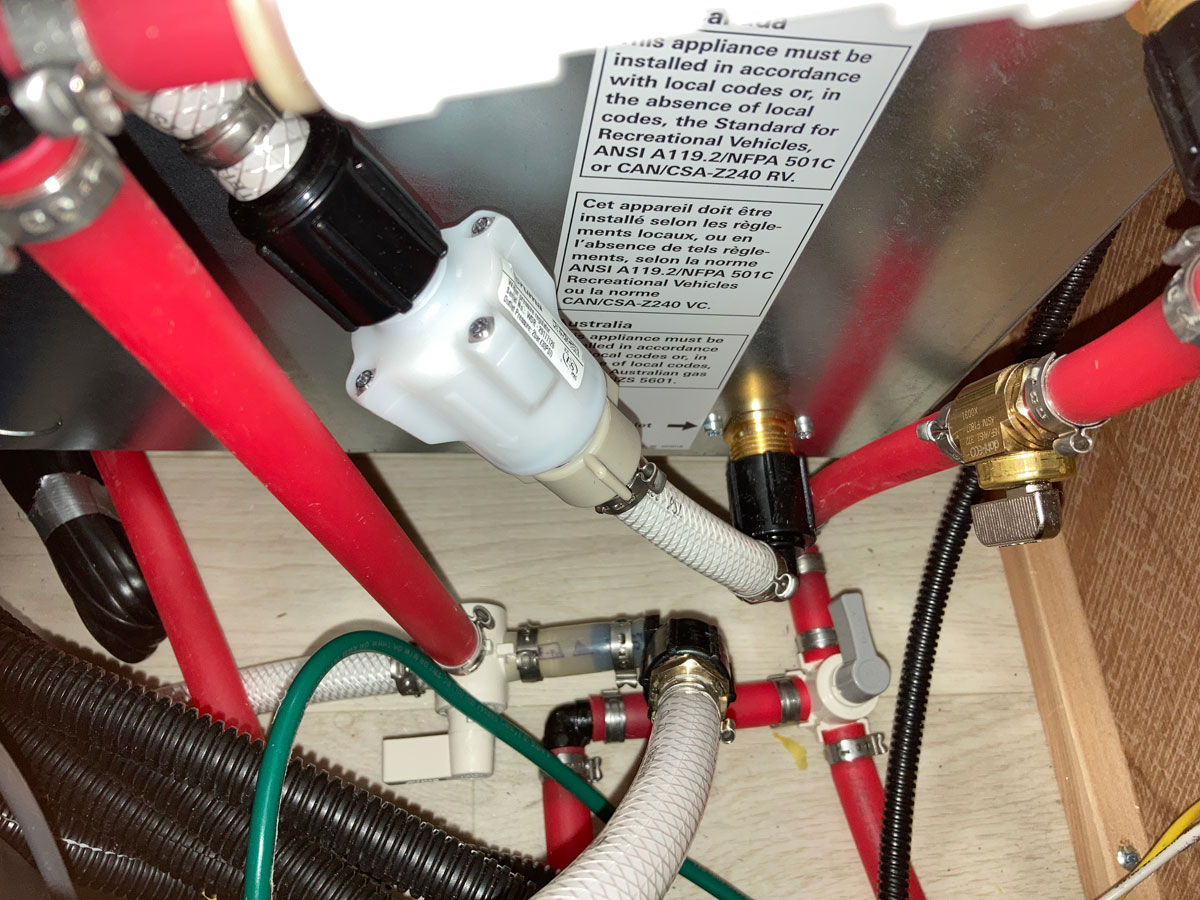
This photo shows where the induction cooktop 20 amp receptacle is located underneath the sink, right hand side:
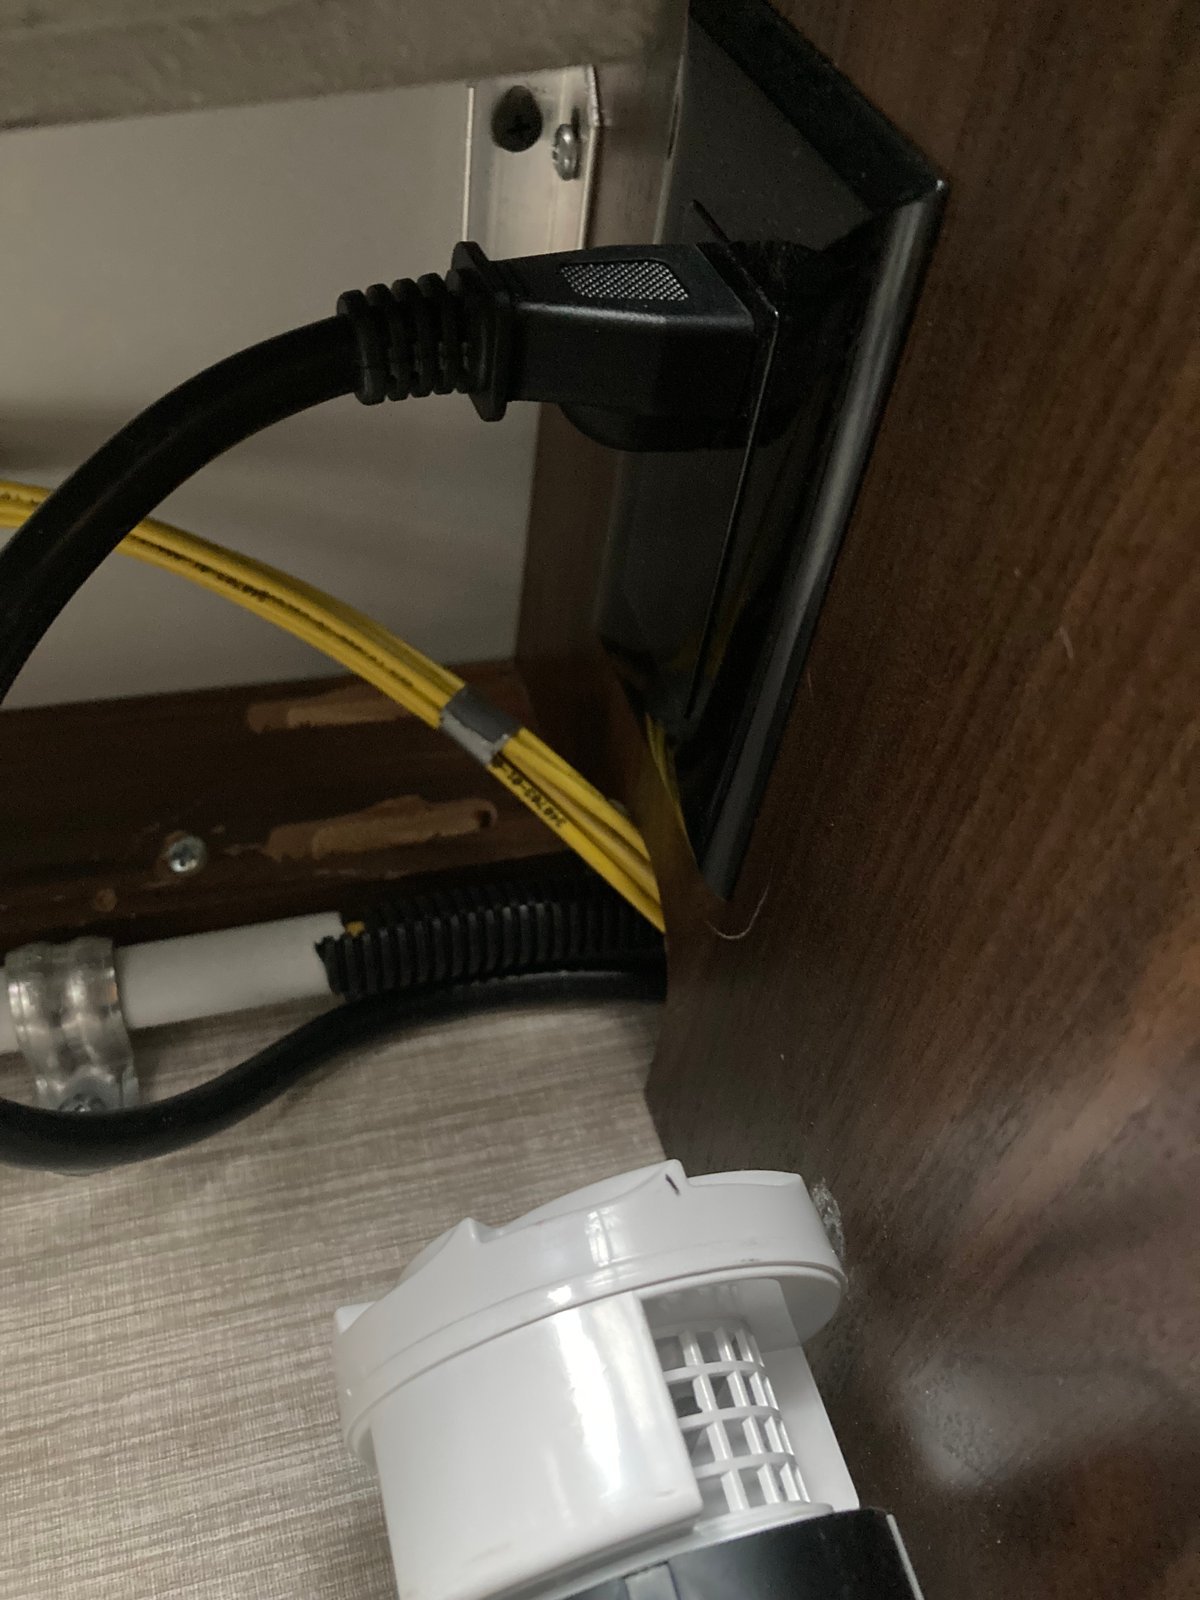
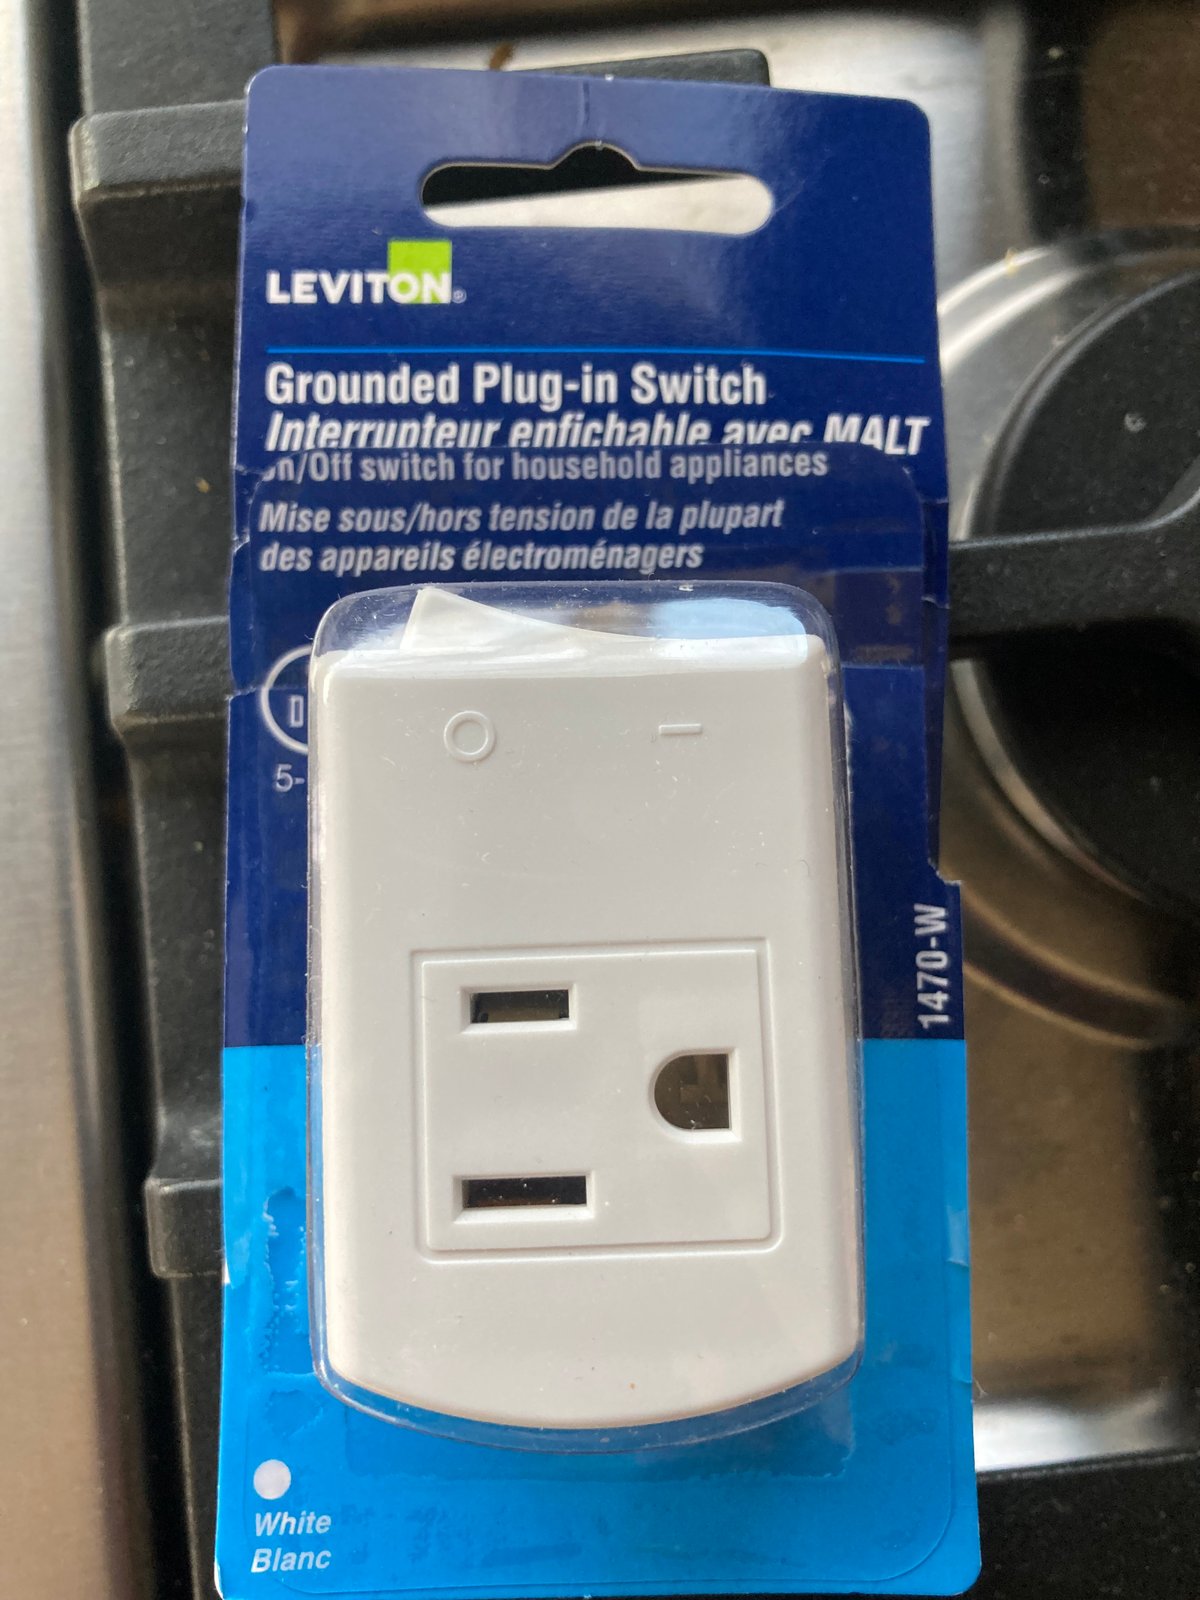
This is the 15 amp plug-in switch we purchased from our local orange building centre - its 15 amp rating is plenty for the cooktop draw we have observed during our cooking:
And, here is the induction cooktop plug and plug-in switch all ready to go:
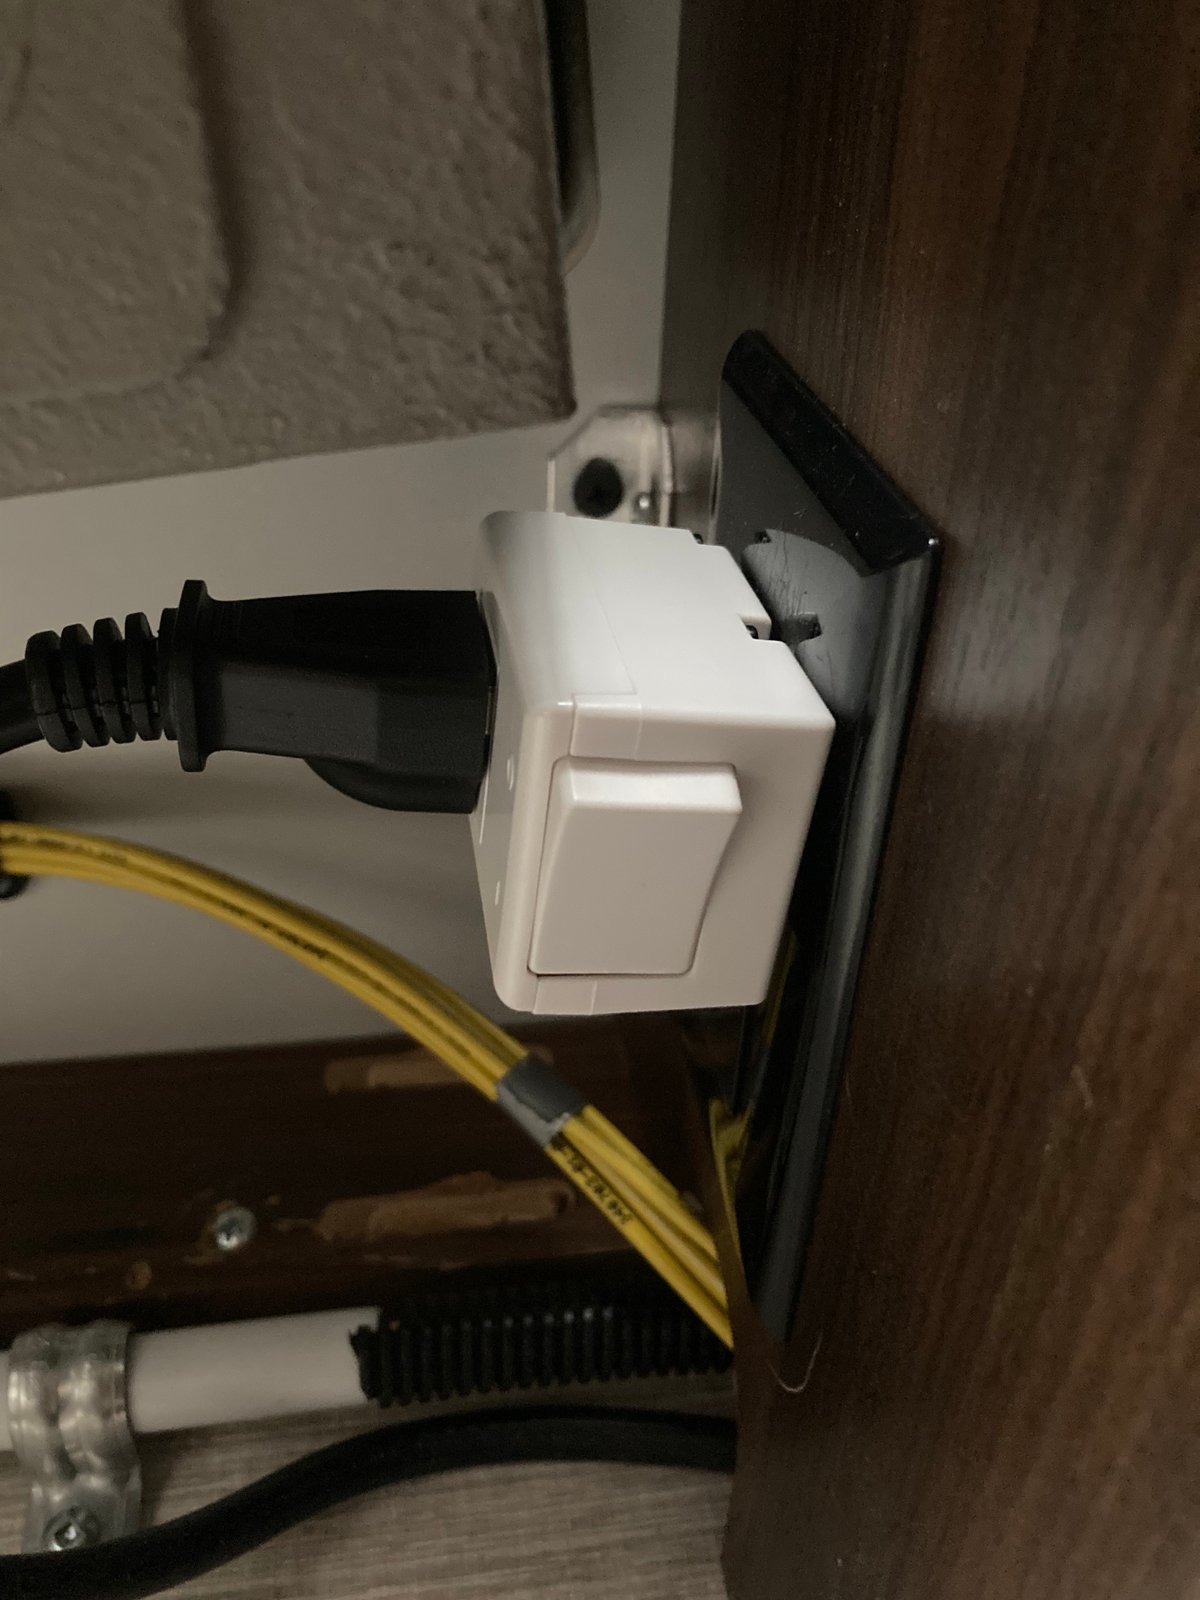
We can now open up the right hand sink cupboard door, and reach in to flick the switch to allow power to flow to the induction cooktop - when we would really like to see it lit up as we prepare to use it for cooking.