RV Chassis Battery Maintainer | RV Mods
Our previous coaches had the capability to trickle charge the chassis (Sprinter) battery from the house (RV) battery charging system. This was one of those “no brainers” that we took for granted on our Class B Sprinter. If there was solar feeding the coach batteries, there was solar floating the chassis battery as well.
I was very surprised to learn that View owners had to resort to aftermarket solutions to deal with chassis batteries that would drain during extended periods of storage. While there are a number of options out there, YouTube convinced me that the Trik – L – Start product from LSL Products of San Antonio, Texas, was a pretty simple and reliable choice. It was by far the preferred choice for owners of all types of lead acid batteries, but I did not see much info on what owners of Lithium batteries had done when making their choice.
After some research on the LSL website, I noted that their big brother product, the Amp – L – Start had a dedicated setting for Lithium batteries, and has voltage control points that are considerably different from the Trik – L – Start. I contacted the company, and had a really thorough and productive email exchange with the General Manager. Here is what I learnt about how Lithium batteries co-exist with their chassis battery maintenance products:
• The Trik – L – Start will work with Lithium coach batteries, but unfortunately will continuously provide current to the chassis battery until the coach batteries are less than 20 % state of charge. Because the Trik – L – Start is programmed for a lead acid chemistry, and wants to disconnect from the chassis battery when the coach battery is observed not to be charging, the Trik – L – Start waits for the coach battery to drop to a voltage close to what it thinks should be an appropriate resting voltage. A voltage close to a resting voltage on a lead acid battery is actually less than 20% state of charge on a lithium battery. Essentially, the Trik – L – Start remains engaged for almost a full discharge cycle of the Lithium coach battery. If you have a Trik – L – Start hooked up with Lithium coach batteries, you are not obtaining all the performance you have signed up for with your LifePO4 batteries.
The amount of coach battery discharge will depend on the health of your chassis battery; a healthy chassis battery that is content to sit at its resting voltage with little help from the Trik – L – Start will not cause an excessive coach battery drain. But an unhealthy chassis battery will gladly accept help from the Lithium coach batteries until they have less than 20% state of charge remaining.
The actual numbers for the Trik – L – Start are: active at 13.0 volts, and inactive at 12.8 volts. A 13.0 volt engage setting will mean that the Trik – L – Start incorrectly assumes a charge on the Lithium coach battery is occurring, and becomes eager to pass current to the chassis battery. When the 12.8 volt disengage setting is reached in the Trik – L – Start, your Lithium battery will be at approximately a 17% state of charge, having been attempting to pass current to your chassis battery for almost the full duration of the Lithium batteries’ discharge cycle.
• The Amp – L – Start, on the other hand, has a user pin programmable configuration that caters to the relatively high operating voltages of a Lithium battery. This option is standard on the G2 and later versions, of the product. The voltage control points are set to ensure that the Amp – L – Start only connects to the chassis battery when the Lithium coach batteries are truly charging or floating, and disconnects quickly once it is recognized that no charging or floating is present and the Lithium battery is undergoing a discharge cycle. The Amp – L – Start engaged voltage is 13.45 volts, which is slightly higher than its resting voltage. It becomes disengaged at 13.35 volts, ensuring that the Lithium battery is very close to having its entire capacity available to the coach loads only.
The drawbacks to having to buy an Amp – L – Start instead of a Trik – L – Start?
• It is slightly more expensive.
• You have to supply your own connection wires - The Amp – L – Start is designed to supply more current to your chassis battery, if required. As a result, the wire needs to be at least 12 gauge (10 gauge for long wire runs) which will carry three time the current the thin gauge wires attached to the Trik – L – Start are rated to carry.
• The Lithium configuration pin strap and connection terminals are exposed to the environment, while the Trik – L – Start has all of its components fully sealed in its resin block. (Not a big deal, really, everything under the co-pilot’s seat is exposed anyway)
Advantages to buying an Amp – L – Start?
• If you have not yet decided to go Lithium, you can simply configure the pin strap to allow the Amp – L – Start to be compatible with lead acid chemistry. Once you have sprung for Lithium, change the pin strap and you are all set for LifePO4.
• If you have lead acid coach batteries in combination with a temperature compensated house battery charger, the Amp – L – Start also allows a pin configuration that will optimize the control voltages taking into account temperature compensation.
I don’t expect to require the increased current capability of the Amp – L – Start during its chassis battery maintenance function, so it will be overkill for this role in our View. But, the capability to function optimally with Lithium batteries makes it worth the few extra dollars for us.
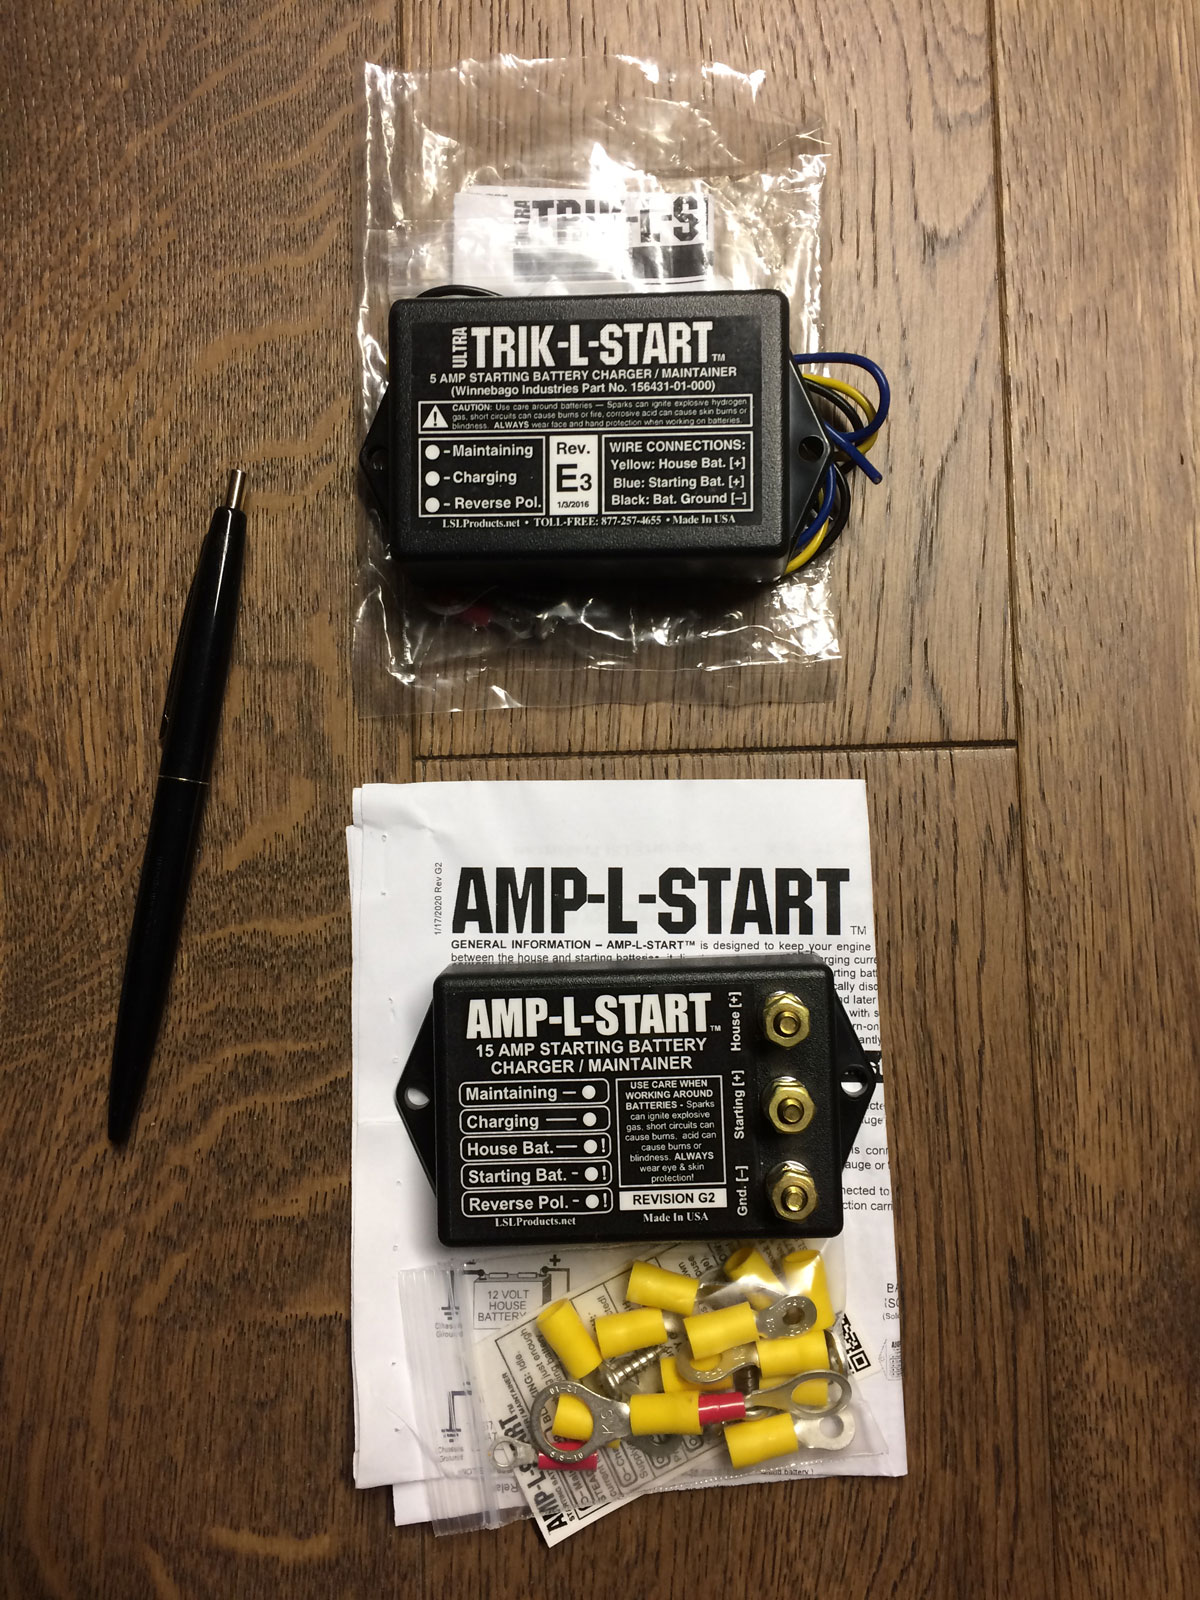
Here is a size comparison of both maintainers. You can see that the Trik - L - Start comes with leads already attached to the box, while the Amp - L - Start requires you to supply the wires. Both kits have all the necessary connecting and mounting hardware included.
The Amp – L – Start installation went pretty smoothly. Prior to the 2020 year, the recommended location from everyone who has installed its brother, a Trik – L – Start, in a View was to attach the connections to the posts of the battery relay solenoid under the passenger’s seat; easy to find, easy to do. On the 2020 / 2021 Views they eliminated that solenoid and replaced it with a current limited electronic charge relay, still located under the passenger’s seat. This relay does most of the same job as the old solenoid, but its extra addition to the motor home was to control the charge current from the Sprinter’s alternator, limiting it to 40 amps. Now that they have a LiFePO4 option out of the factory, and knowing that some of their lead acid customers were going to drop in their own lithium batteries, I was told by Forest City that Mercedes asked Winnebago to install a current limiter to protect the chassis alternator from the aggressive charging that lithium batteries are capable of demanding.
Starting into the work, first things first - unless you are a skilled surgeon and have complete control over your hands and fingers, I’d recommend that you completly isolate both the Sprinter chassis battery and the coach batteries from the electrical system of your RV. The easiest way to isolate the chassis battery is to pull the quick disconnect hidden behind that little panel down by the gas pedal. Pushing the button on top of the disconnect plug will allow you to remove the chassis ground and isolate the Sprinter’s battery. As you know, under the entry step-well to the coach is where the RV batteries are kept - remove ALL negative cables from the battery posts to isolate the coach batteries.
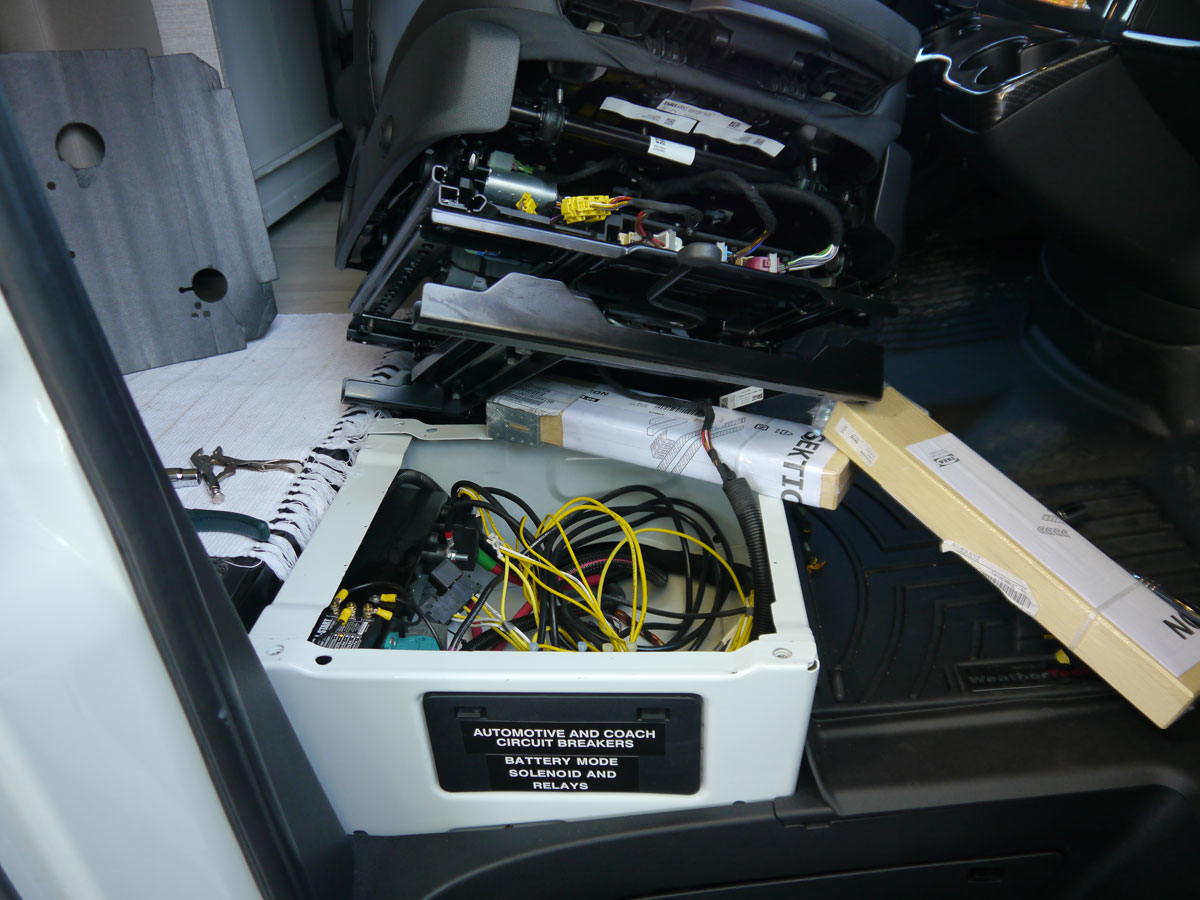
I had been not looking forward to removing the passenger seat, for some reason. I imagined having to deal with motors and wiring, awkward disconnects of cable plugs that I always seem to have trouble getting apart, and then getting something wrong when putting it all back together. My imagination took me as far as having to admit defeat while booking an appointment at the dealer I usually dread going to. But, it turns out there is an RV mod god after all. Four torx bolts, and the whole seat assembly lifted off without having to disconnect the lone electrical cable. The cable has enough slack that you can support the seat gently on the driver’s seat, and you have full access to the gear under the seat pedestal. Ok, I had to go out and buy a torx socket set… but I have always wanted one of those anyway…
Here’s the seat off; you can see the lone cable you have to keep an eye on…
After you have had a look at the contents of the Amp - L - Start package, make sure that you have set the pin configuration on the back of the unit correctly. It comes out of the factory with the pin set for a lead acid battery, so you’ll need to move the pin if you have a lithium configuration. But, even if you do not have to move the pin - it would be a good idea to check your setting against the instructions…
The MasterVolt charge relay is mounted on the aft wall of the pedestal box, and right above it is a shelf that is perfect for the Amp – L – Start to sit. I mounted the Amp – L – Start as close to the outboard wall of the pedestal as comfortable, so when the seat is back installed you can lift the Styrofoam cover sheet underneath and have a look at what the unit is doing.
In the picture below, note that I attached the ground wire directly to the pedestal box, instead of trying to figure out the best ground wire among some of the options in the wire nest in the seat pedestal box. You will have to remove a bit of paint when you drill your hole, but after that the ground is good and solid. The manufacturer reccomends 12 gauge wire for short wire runs, or 10 guage for longer runs. I used 12 gauge wire for this very short distance.
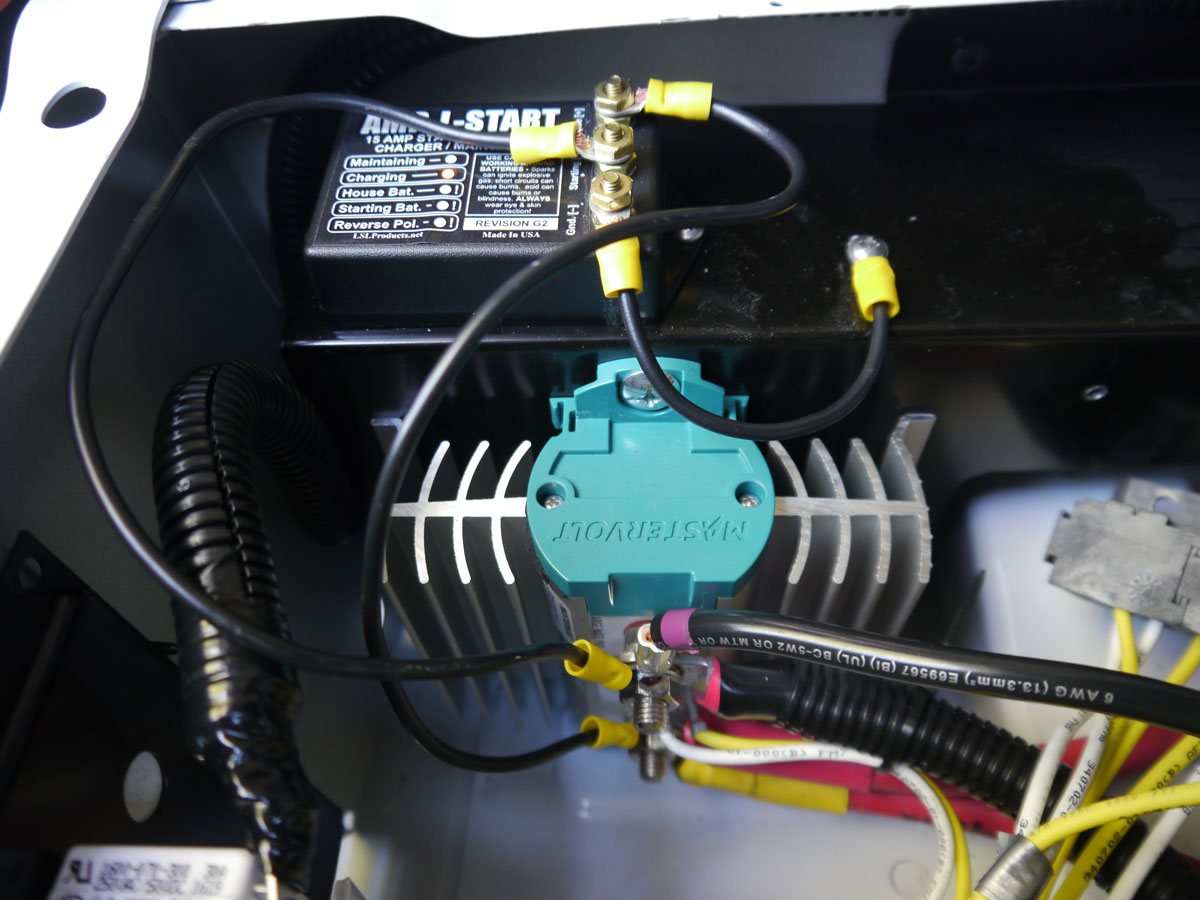
The wire hookup is very straightforward. The Amp - L - Start “Starting” post goes to the top post on the charge relay (from the Sprinter Alternator), and the “House” post goes to the bottom post on the charge relay (to the coach batteries).
Does it work? Well, yes it does. So far so good. I’ve watched the sun come up and wake up the solar controller, seen the solar controller decide it wants to give a shot to the coach batteries, watched as the Amp – L – Start flips over to a charge cycle to give the chassis battery a spurt of charge current, and then have seen it all shut down as the solar controller decides the coach batteries are good enough - followed by the Amp – L – Start losing interest in maintaining the chassis batteries.
Working as advertised.
Note: LSL Products out of San Antonio, Texas, are no longer in operation. As a result, the Trik-L-Start and Amp-L-Start are no longer available. But, as of 2025, I see that there is an alternative that is advertised to be as simple to install as the LSL products. Check out this link if want to research a substitute for the Trik-L-Start or Amp-L-Start:
House2Start Chassis Battery Maintainer